Working with Hatching or Filling Objects in AutoCAD
AutoCAD is an amazing application which can be used for creating impressive engineering drawings as well as architectural designs. In this tutorial you will learn how to hatch or fill an object or an area. You can also learn How to Draw a Simple Plate in AutoCAD. In order to learn how to hatch or fill an object or an area you need to follow these simple steps.
- 1st of all you need to click on Home tab>Draw panel>Hatch.
- Now from the Properties panel select Hatch type list. Properties panel>Hatch Type list.
- On the Pattern panel you need to click a hatch pattern or fill.
- From the Boundaries panel you need to specify the how the pattern boundary is selected:
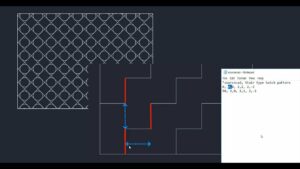
- Pick Points. It will insert the hatch or fill within a closed area which is bounded by one or more objects. With this process you will click within the boundaries to specify the area.
- Select Boundary Objects. It will hatch or fill within a closed object like circle, closed polyline or set of objects with endpoints which touches and enclose an area.
The selection method will be retained till you change it.
- Now click on the area or object which is to be hatched.
- ON the ribbon make the adjustments as needed:
- On the Properties panel change the hatch type and colors or modify the transparency level, angle or scale for hatching.
- On the expanded option panel you can modify the draw order to specify whether the hatch and its boundaries are displayed in front of or behind other objects.
- Now press enter for applying the hatch and then exit the command.