Streamlining Web Development: A Comprehensive Guide to Using Server-Side Includes (SSI) in Adobe Dreamweaver
Introduction: Server-Side Includes (SSI) are powerful tools for managing and organizing website content efficiently. They allow web developers to include common elements such as headers, footers, navigation menus, and sidebars across multiple web pages without duplicating code. Adobe Dreamweaver, a leading web development tool, provides robust support for Server-Side Includes, enabling developers to streamline their workflow and maintain consistency across their websites. In this extensive guide, we’ll explore the process of using Server-Side Includes in Adobe Dreamweaver, covering various techniques, best practices, and customization options to help you optimize your web development process.
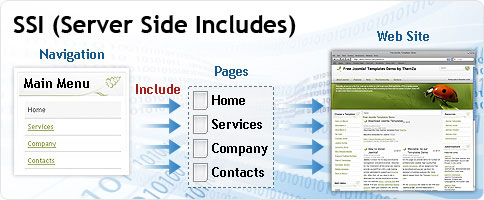
Understanding Server-Side Includes (SSI): Server-Side Includes (SSI) are directives that are processed by the web server to dynamically include content from external files into web pages before they are served to the client’s browser. Key benefits of using SSI include:
- Code Reusability: SSI allow developers to reuse code snippets across multiple web pages, reducing redundancy and simplifying maintenance.
- Consistency: SSI ensure consistent design and functionality across all web pages by centralizing the management of common elements such as headers, footers, and navigation menus.
- Efficiency: SSI streamline the web development process by enabling developers to update shared content in one place, eliminating the need to edit each individual web page.
- Scalability: SSI facilitate scalability by making it easy to add or modify shared content elements as websites grow and evolve over time.
Step 1: Setting Up Your Dreamweaver Project Before using Server-Side Includes in Adobe Dreamweaver, you need to set up your Dreamweaver project and configure your web server to support SSI. Follow these steps to get started:
- Create a new Dreamweaver project or open an existing project in Dreamweaver.
- Ensure that your web server supports Server-Side Includes (SSI). Apache, Nginx, and most other web servers support SSI by default, but you may need to enable SSI configuration if it’s not already set up.
- Configure your web server to recognize files with the “.shtml” extension as SSI-enabled files. This typically involves adding a configuration directive such as “AddType text/html .shtml” to your server configuration file.
- Verify that SSI is working correctly by creating a test SSI file with a simple include directive and accessing it through your web browser. If the included content appears on the page, SSI is functioning properly.
Step 2: Creating Server-Side Includes in Dreamweaver Adobe Dreamweaver provides several methods for creating Server-Side Includes, including Insert options, Code Snippets, and the Files panel. Here’s how to create Server-Side Includes in Dreamweaver:
- Using Insert Options: Open the web page where you want to insert a Server-Side Include in Dreamweaver. Place the cursor at the location where you want the included content to appear. Go to the “Insert” menu and select “Server-Side Include” from the dropdown menu. Choose the desired SSI file from the list of available files or enter the file path manually. Dreamweaver will insert the SSI directive into your web page.
- Using Code Snippets: Open the web page in Dreamweaver and switch to the “Code” view. Locate the position in the code where you want to insert the Server-Side Include directive. Go to the “Snippets” panel and select the “Server-Side Includes” category. Drag the desired SSI snippet from the panel and drop it into the code view at the desired location. Dreamweaver will insert the SSI directive into your code.
- Using the Files Panel: Open the Files panel in Dreamweaver and navigate to the directory where you want to create the SSI file. Right-click on the directory and select “New File” from the context menu. Enter a filename with the “.shtml” extension, such as “header.shtml” or “footer.shtml”. Open the newly created SSI file and add the desired content using standard HTML markup. Save the file, and Dreamweaver will automatically recognize it as a Server-Side Include.
Step 3: Managing and Customizing Server-Side Includes Once you’ve created Server-Side Includes in Adobe Dreamweaver, you can manage and customize them to suit your needs. Here are some tips for managing and customizing Server-Side Includes in Dreamweaver:
- Organize Your Includes: Keep your Server-Side Includes organized by creating separate files for different types of content, such as headers, footers, navigation menus, and sidebars. Use descriptive filenames and directory structures to make it easy to locate and manage your includes.
- Edit Includes in Dreamweaver: Use Dreamweaver’s built-in code editor to edit your Server-Side Includes directly within the Dreamweaver interface. Simply double-click on the SSI file in the Files panel to open it for editing. Make changes as needed, and Dreamweaver will automatically update all pages that include the SSI.
- Customize Includes with Variables: Take advantage of Server-Side Include variables to customize included content dynamically. Define variables in your SSI files using the <!–#set var=”name” value=”content” –> directive and reference them in your HTML markup using the <!–#echo var=”name” –> directive. This allows you to create reusable includes that adapt to different contexts or scenarios.
- Preview Includes in Design View: Use Dreamweaver’s Design view to preview how your Server-Side Includes will appear on the final web pages. Dreamweaver dynamically renders included content in Design view, allowing you to visualize the layout and formatting in context with the rest of your page content.
- Test Includes Locally: Test your Server-Side Includes locally on your development server to ensure they are working correctly before deploying them to a production environment. Use Dreamweaver’s built-in web server or a local development environment such as XAMPP or WAMP to test your includes in a controlled environment.
Step 4: Deploying Your Dreamweaver Project Once you’ve created and customized your Server-Side Includes in Dreamweaver, it’s time to deploy your project to a live web server. Follow these steps to deploy your Dreamweaver project with Server-Side Includes:
- Upload Your Files: Use Dreamweaver’s built-in FTP or SFTP functionality to upload your project files to the live web server. Ensure that you upload both the main web pages and the Server-Side Includes directory containing your SSI files.
- Set File Permissions: Set appropriate file permissions for your Server-Side Includes directory and files on the live web server to ensure they are accessible to the web server process. Consult your web hosting provider or server administrator for guidance on setting file permissions.
- Test Your Website: Test your website on the live server to ensure that Server-Side Includes are functioning correctly and that included content appears as expected. Use a web browser to access your web pages and verify that included content is rendered correctly on each page.
- Monitor Performance: Monitor the performance of your website with Server-Side Includes deployed in a production environment. Keep an eye on server load times, page load times, and user experience metrics to identify any performance issues and optimize your SSI implementation as needed.
Step 5: Maintenance and Optimization Regularly maintain and optimize your Server-Side Includes in Adobe Dreamweaver to ensure they remain effective and efficient over time. Here are some tips for maintaining and optimizing your SSI implementation:
- Update Content Regularly: Update your Server-Side Includes as needed to reflect changes in your website content, design, or functionality. Keep included content up-to-date and relevant to maintain consistency across your web pages.
- Monitor Performance: Monitor the performance of your Server-Side Includes implementation and optimize them for speed and efficiency. Minimize file sizes, reduce server requests, and cache frequently accessed includes to improve performance and scalability.
- Test Compatibility: Test your Server-Side Includes across different web browsers, devices, and screen sizes to ensure compatibility and responsiveness. Use Dreamweaver’s built-in browser preview and device emulation tools to test your includes in various environments.
- Backup Your Files: Regularly backup your Server-Side Includes files and project files in Dreamweaver to prevent data loss and ensure recoverability in case of unexpected issues or server failures. Use version control systems or cloud storage solutions to securely store backups of your files.
Conclusion: Using Server-Side Includes (SSI) in Adobe Dreamweaver allows web developers to streamline their workflow, maintain consistency, and improve efficiency in managing website content. By following the steps outlined in this guide and leveraging Dreamweaver’s features and tools, you can create powerful and flexible Server-Side Includes that enhance the functionality and usability of your websites. Whether you’re a beginner or experienced web developer, mastering the art of using Server-Side Includes in Dreamweaver empowers you to create dynamic and maintainable websites that meet the needs of your audience and adapt to changing requirements over time.


