Streamlining Communication: A Comprehensive Guide to Implementing Contact Forms in Adobe Dreamweaver
Introduction: Contact forms are essential components of websites, providing visitors with a convenient way to communicate with website owners, submit inquiries, and provide feedback. Adobe Dreamweaver, a powerful web development tool, offers developers a range of features and tools to create and customize contact forms seamlessly. In this extensive guide, we’ll explore the process of implementing contact forms in Adobe Dreamweaver, covering various techniques, best practices, and customization options to help you streamline communication and enhance user engagement on your website.
Understanding the Importance of Contact Forms: Contact forms serve as a bridge between website visitors and website owners, facilitating communication and interaction. Key benefits of contact forms include:
- Accessibility: Contact forms provide a user-friendly interface for visitors to reach out to website owners, regardless of their location or time zone.
- Convenience: Contact forms offer a convenient way for visitors to submit inquiries, requests, or feedback without the need for email clients or phone calls.
- Organization: Contact forms help streamline communication by collecting essential information from visitors, such as name, email address, subject, and message, in a structured format.
- Spam Prevention: Contact forms can incorporate anti-spam measures, such as CAPTCHA verification or honeypot fields, to reduce spam submissions and protect against unwanted solicitations.
Step 1: Planning Your Contact Form Before implementing a contact form in Adobe Dreamweaver, it’s essential to plan its structure, fields, and functionality. Consider the following factors when planning your contact form:
- Required Fields: Determine which fields are essential for collecting visitor information, such as name, email address, subject, and message. Balance the need for information with user convenience to avoid overwhelming visitors with unnecessary fields.
- Validation: Decide on validation requirements for each form field to ensure the accuracy and completeness of submitted information. Implement client-side validation for immediate feedback and server-side validation for additional security.
- Submission Method: Choose a submission method for your contact form, such as email, server-side processing, or integration with a third-party service like Formspree or Formstack. Consider factors such as security, reliability, and ease of implementation when selecting the submission method.
- Confirmation Message: Plan a confirmation message or redirect page to provide feedback to visitors upon successful form submission. Consider including additional instructions or follow-up steps to guide visitors after submitting the form.
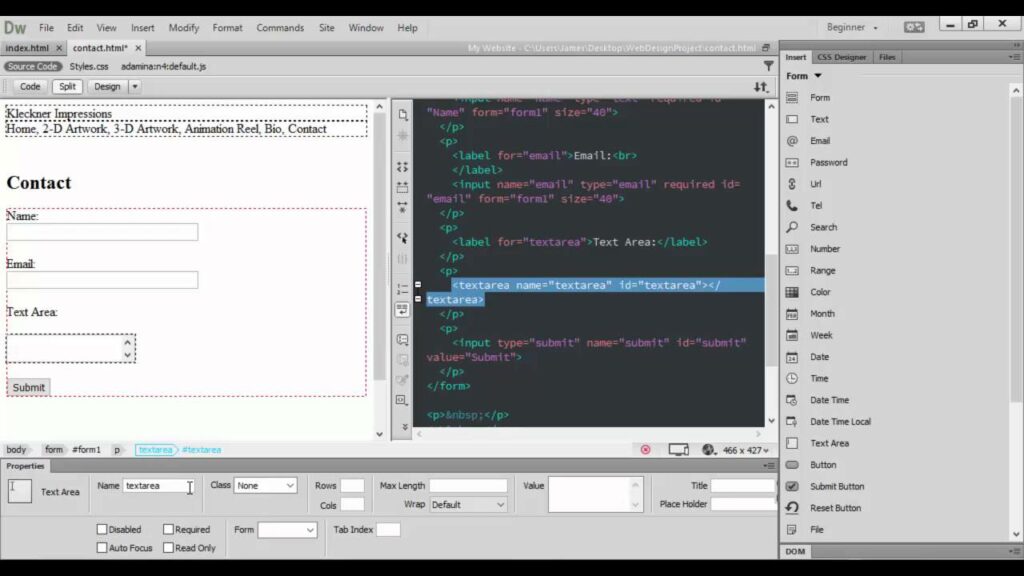
Step 2: Creating the Contact Form Markup Adobe Dreamweaver simplifies the process of creating contact form markup using its visual design tools and code editor. Here’s how to create the contact form markup in Dreamweaver:
- Open Dreamweaver and create a new HTML document for your contact form.
- Use Dreamweaver’s Insert panel or Insert menu to add form elements such as text fields, text areas, dropdown menus, checkboxes, and radio buttons to the document.
- Define form fields for collecting visitor information, including name, email address, subject, message, and any additional custom fields you require.
- Add labels and placeholders to each form field to provide context and guidance for visitors.
- Include a submit button to allow visitors to submit the form once they’ve entered their information.
Step 3: Styling and Customization Once you’ve created the contact form markup, you can customize its appearance and styling using CSS in Adobe Dreamweaver. Consider the following customization options:
- Form Layout: Define the layout and positioning of form elements using CSS styles such as float, display, and positioning properties. Experiment with different layouts to optimize usability and visual appeal.
- Typography: Customize the typography of form elements, including font family, font size, font weight, line height, and text color, to match your website’s design aesthetics.
- Color Scheme: Choose a color scheme for your contact form that complements your website’s design theme. Use CSS color properties to style form elements, backgrounds, borders, and submit buttons.
- Responsive Design: Ensure that your contact form is responsive and adapts to different screen sizes and devices. Use CSS media queries to adjust layout, font sizes, and spacing for optimal usability on desktops, tablets, and smartphones.
Step 4: Adding Functionality and Validation In addition to styling, Adobe Dreamweaver allows you to add functionality and validation to your contact form using JavaScript and server-side scripting. Here’s how to enhance your contact form in Dreamweaver:
- Client-Side Validation: Use JavaScript to implement client-side form validation to check for errors such as empty fields, invalid email addresses, or incorrect formatting before the form is submitted. Provide feedback to users in real-time to guide them in correcting errors.
- Server-Side Processing: Implement server-side processing using a server-side scripting language such as PHP, ASP.NET, or Node.js to handle form submissions securely. Process submitted form data, sanitize inputs, and send email notifications to the website owner.
- CAPTCHA Verification: Integrate CAPTCHA verification into your contact form to prevent spam submissions and protect against automated form submissions by bots. Use third-party CAPTCHA services or implement custom CAPTCHA solutions to add an extra layer of security.
- Error Handling: Implement error handling mechanisms to handle unexpected errors or server-side failures gracefully. Display error messages to users and provide instructions on how to resolve issues and resubmit the form if necessary.
Step 5: Testing and Optimization After implementing and customizing your contact form in Adobe Dreamweaver, it’s essential to test its functionality and performance across different browsers, devices, and operating systems. Conduct thorough testing to ensure that your contact form behaves as expected and provides a seamless user experience. Monitor form submissions, track analytics data, and gather user feedback to identify any usability issues or performance bottlenecks and make necessary optimizations to improve the overall effectiveness of your contact form.
Conclusion: Implementing a contact form in Adobe Dreamweaver allows you to create a seamless communication channel between website visitors and website owners, facilitating inquiries, feedback, and interaction. By following the steps outlined in this guide and leveraging Dreamweaver’s features and tools, you can design and customize contact forms that align with your website’s design aesthetics and meet your communication needs. Whether you’re a beginner or experienced web developer, mastering the art of implementing contact forms in Dreamweaver empowers you to enhance user engagement and streamline communication on your website, ultimately contributing to a positive user experience and fostering stronger connections with your audience.


