Precision Refinement: A Comprehensive Guide to Readjusting Existing Curves in CorelDRAW

Introduction:
CorelDRAW, a powerful vector graphics editor, provides artists, designers, and illustrators with a versatile platform to bring their creative visions to life. Among the myriad tools available, the ability to readjust existing curves stands out as a crucial skill in the digital design workflow. In this extensive guide, we will delve into the intricacies of readjusting existing curves in CorelDRAW, exploring various techniques, customization options, and advanced tips to empower you in achieving precision and finesse in your digital artwork. Whether you’re refining intricate illustrations, modifying lettering, or perfecting the contours of shapes, mastering the art of curve readjustment elevates your designs within the dynamic world of CorelDRAW.
Understanding Curve Readjustment in CorelDRAW:
Curve readjustment refers to the process of modifying the shape, position, or attributes of an existing curve. In CorelDRAW, curves are fundamental components of vector graphics, and the ability to readjust them allows for intricate design modifications without compromising quality. Whether you are working with Bézier curves, freehand curves, or complex shapes, CorelDRAW provides a range of tools and techniques to facilitate precise curve adjustments.
Basic Techniques for Curve Readjustment:
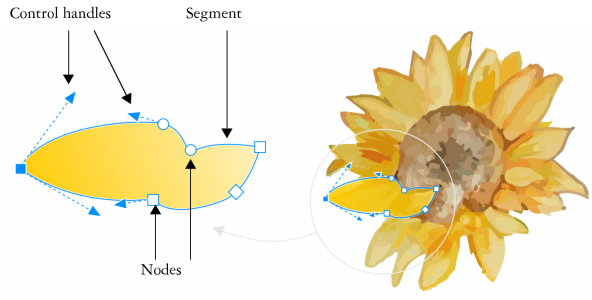
- Selecting the Curve: To readjust an existing curve, first, select the curve using the Pick tool. Click on the curve to activate it, and you’ll notice nodes and control handles appearing along the curve.
- Node Editing: Nodes are the anchor points that define the shape of a curve. Click on a node to select it, and then use the Shape tool to manipulate the position of the node. Drag the node to adjust the curve’s shape or move the entire curve.
- Adjusting Control Handles: Control handles dictate the direction and curvature of a curve. Click on a node to select it, and then manipulate the control handles by dragging them. Adjusting the length and angle of control handles allows for precise control over the curve.
- Curve Smoothing: Utilize the Smooth tool to refine the smoothness of curves. Select the curve, activate the Smooth tool, and drag it along the curve. This tool helps eliminate unnecessary jaggedness and refines the overall appearance of the curve.
Advanced Techniques for Curve Readjustment:
- Convert to Bézier: For curves drawn with the Freehand tool, consider converting them to Bézier curves for more advanced manipulation. Select the curve, right-click, and choose ‘To Bézier.’ This enables precise control over individual nodes and handles.
- Using the Virtual Segment Delete Tool: The Virtual Segment Delete tool allows you to remove virtual segments between nodes without affecting the actual curve. Select the tool, click on a virtual segment, and delete it to refine the curve’s appearance.
- Envelope Distortion: Explore envelope distortion for more complex curve adjustments. Select the curve, access the ‘Effects’ menu, choose ‘Distort,’ and then ‘Envelope.’ This tool allows you to manipulate the curve within a customizable envelope shape.
Customization Options for Precision:
- Adjusting Line Properties: Tailor the appearance of your curve by adjusting line properties. Access the ‘Outline’ or ‘Pen’ settings in the ‘Object Properties’ docker to modify line thickness, color, and style for both the entire curve and individual segments.
- Fine-Tuning with the Shape Tool: After readjusting the curve, use the Shape tool to fine-tune individual nodes and segments. Click and drag nodes or segments to achieve pixel-perfect adjustments, enhancing precision in your design.
- Snapping Options for Alignment: Utilize snapping options to ensure accurate alignment of curves. Enable ‘Snap to Grid,’ ‘Snap to Guidelines,’ or ‘Snap to Objects’ to facilitate precise placement and maintain consistency.
Troubleshooting and Optimization Strategies:
- Avoiding Overlapping Nodes: Exercise caution to prevent overlapping nodes, which can create unwanted artifacts in your curves. Utilize the Simplify tool or manually adjust nodes to maintain a clean and smooth appearance.
- Grid Usage for Alignment: Enable the grid and adjust its properties to align curves systematically. The grid provides a structured reference for maintaining consistency in your design.
- Saving Iterations and Versions: Save iterations and versions of your design as you readjust curves. This ensures that you can revisit and build upon different stages of your project, fostering a non-linear and exploratory approach to digital illustration.
Conclusion:
Readjusting existing curves in CorelDRAW is a fundamental skill that empowers designers to achieve precision and finesse in their digital creations. By exploring the various techniques, customization options, and advanced tips presented in this comprehensive guide, you’ll gain the confidence to refine and perfect your curves with ease. Whether you’re crafting detailed illustrations, tweaking letterforms, or modifying complex shapes, CorelDRAW empowers you to design with precision within the dynamic world of vector graphics. Embrace the versatility of curve readjustment, and let your creativity flourish on the digital canvas with the comprehensive tools CorelDRAW provides.


