Precision and Patience: A Comprehensive Guide to Setting Delay Before Input Stroke Adjustments in CorelDRAW
Introduction:
CorelDRAW, a leading vector graphics editor, empowers artists, designers, and illustrators to create with precision and finesse. Among its myriad features, the ability to set a delay before input stroke adjustments stands out as a nuanced tool for achieving meticulous control over your digital artwork. In this extensive guide, we will explore the intricacies of configuring the delay before input stroke adjustments in CorelDRAW, examining techniques, customization options, and advanced tips to empower you in refining your digital strokes with patience and precision. Whether you are fine-tuning intricate details or seeking a deliberate approach to stroke adjustments, mastering this feature adds a layer of control to your creative process within the dynamic world of CorelDRAW.
Understanding the Delay Before Input Stroke Adjustments:
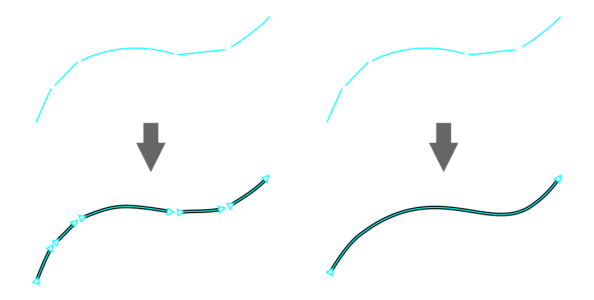
The delay before input stroke adjustments is a feature in CorelDRAW that allows users to set a time interval before the software processes and adjusts the strokes made with drawing tools. This delay offers a deliberate and patient approach to stroke adjustments, enabling users to control the responsiveness of the application to their input. Whether you are working on freehand sketches, precision illustrations, or intricate designs, configuring the delay before adjustments enhances your ability to achieve the desired strokes with accuracy.
Basic Techniques for Configuring the Delay:
- Accessing the Delay Settings: To configure the delay before input stroke adjustments, navigate to the ‘Tools’ menu and select ‘Options.’ Within the Options dialog box, go to the ‘Drawing’ category. Here, you’ll find the ‘Delay Before Adjusting’ section, which allows you to customize the delay settings.
- Setting the Delay Duration: Within the ‘Delay Before Adjusting’ section, adjust the slider or numerical input to set the desired delay duration. The delay is measured in milliseconds, allowing you to fine-tune the responsiveness of the drawing tools to your input strokes.
- Applying the Changes: After setting the delay duration, click ‘OK’ to apply the changes and close the Options dialog box. The configured delay will now be in effect for all relevant drawing tools in CorelDRAW.
- Testing the Configuration: To ensure the configured delay meets your preferences, test it with various drawing tools. Experiment with freehand strokes, lines, and shapes to observe the impact of the delay before adjustments take place.
Advanced Techniques for Optimizing Stroke Adjustments:
- Customizing Delay for Specific Tools: CorelDRAW allows you to customize the delay settings for specific drawing tools. In the Options dialog box, explore the ‘Delay Before Adjusting’ section and choose ‘Customize’ to access tool-specific delay configurations. This granular control is particularly useful when working with a variety of drawing instruments.
- Balancing Speed and Precision: Experiment with different delay durations to find the balance between speed and precision that suits your workflow. A shorter delay enhances real-time responsiveness, while a longer delay provides a deliberate and controlled adjustment process.
- Utilizing Pressure-Sensitive Tablets: If you’re using a pressure-sensitive tablet, leverage its capabilities in conjunction with the delay settings. Adjust the pressure sensitivity to complement the configured delay, allowing for nuanced strokes that respond to varying levels of pressure.
Customization Options for Precision:
- Fine-Tuning Stroke Attributes: Beyond delay settings, tailor the appearance of your strokes by accessing the ‘Outline’ or ‘Pen’ settings in the ‘Object Properties’ docker. Adjust parameters such as line thickness, color, and style to achieve precision in your designs.
- Snapping Options for Alignment: Utilize snapping options to ensure accurate alignment of strokes. Enable ‘Snap to Grid,’ ‘Snap to Guidelines,’ or ‘Snap to Objects’ to facilitate precise placement and maintain consistency.
- Fine-Tuning with the Shape Tool: After configuring the delay, use the Shape tool to fine-tune individual strokes. Click and drag nodes or segments to achieve pixel-perfect adjustments, enhancing precision in your design.
Troubleshooting and Optimization Strategies:
- Adjusting for Different Workflows: Recognize that optimal delay settings may vary based on your workflow. Adjust the delay duration to accommodate the speed and style of your drawing or illustration process.
- Regularly Reassessing Preferences: As your familiarity with CorelDRAW grows and your artistic preferences evolve, periodically reassess and adjust the delay settings. This ensures that your configuration aligns with your evolving creative needs.
- Saving Custom Workspaces: If you’ve customized delay settings and other preferences, consider saving them as a custom workspace. This allows you to switch seamlessly between different configurations based on specific project requirements, optimizing your workflow.
Conclusion:
Configuring the delay before input stroke adjustments in CorelDRAW is a nuanced aspect of the software that enhances your control and precision in digital artwork creation. By exploring the techniques, customization options, and advanced tips presented in this comprehensive guide, you’ll gain the confidence to tailor the responsiveness of drawing tools to your unique workflow. Whether you’re sketching, illustrating, or designing intricate details, CorelDRAW empowers you to achieve strokes with deliberate patience and artistic finesse. Embrace the fluidity and control afforded by the delay settings, and let your creativity flourish within the dynamic world of CorelDRAW.


