Crafting Unity: A Comprehensive Guide to Creating a Single Curve from Strokes in CorelDRAW
Introduction:
CorelDRAW, a renowned vector graphics editor, stands as a versatile canvas for artists, designers, and illustrators. One of the essential skills within this dynamic toolset is the ability to convert multiple strokes into a single unified curve. In this extensive guide, we will explore the intricacies of creating a single curve from strokes in CorelDRAW, delving into various techniques, customization options, and advanced tips. Whether you’re designing intricate illustrations, refining hand-drawn sketches, or streamlining complex shapes, mastering the art of unifying strokes into a single curve enhances your precision and creativity within the dynamic realm of CorelDRAW.
Understanding the Process:
Creating a single curve from strokes involves combining individual stroke elements into a unified vector shape. CorelDRAW offers several tools and methods to achieve this, allowing designers to streamline their workflow, improve editability, and maintain a cohesive design structure. Whether you’ve sketched freehand strokes or created intricate designs using various tools, unifying them into a single curve provides a foundation for further refinement and customization.
Basic Techniques for Creating a Single Curve:
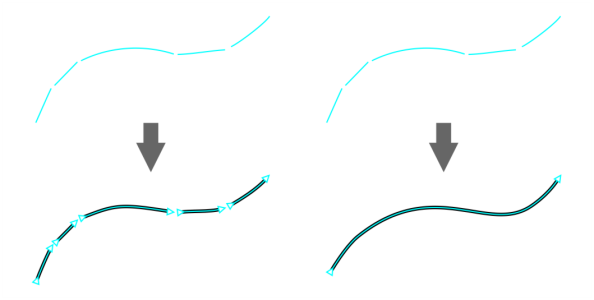
- Selecting Strokes: Begin by selecting the strokes you want to unify. Use the Pick tool to click and drag over the strokes or hold down the Shift key while clicking on individual strokes to make multiple selections.
- Combining with the Weld Tool: Access the ‘Weld’ tool from the toolbar or the ‘Object’ menu. With the selected strokes, click on the ‘Weld’ icon. The Weld tool merges overlapping areas and combines the selected strokes into a single shape, forming a cohesive curve.
- Union Operation: Utilize the ‘Union’ operation to combine selected strokes. With the strokes selected, access the ‘Object’ menu, choose ‘Shaping,’ and then select ‘Union.’ This operation creates a single curve by merging the selected strokes into a unified shape.
- Outline Trace: For strokes created with the Artistic Media tool or other brush tools, consider using the ‘Outline Trace’ feature. Select the strokes, access the ‘Bitmaps’ menu, and choose ‘Outline Trace.’ Adjust the settings to convert the strokes into a vector outline, and then simplify the result if needed.
Advanced Techniques for Creating a Single Curve:
- Shape Recognition: Explore the ‘Shape Recognition’ feature for complex designs. Select the strokes, access the ‘Object’ menu, choose ‘Shaping,’ and then click on ‘Shape Recognition.’ CorelDRAW attempts to recognize and combine the strokes into a unified shape based on the selected category.
- PowerClip and Grouping: Combine PowerClip and grouping techniques for advanced control. Place the strokes into a PowerClip container, and then group the container with other elements. This approach allows for a hierarchical organization while preserving the integrity of the individual strokes.
- Artistic Media Strokes to Objects: If your strokes were created with the Artistic Media tool, convert them to objects for further manipulation. Select the strokes, right-click, and choose ‘Convert Artistic Media to Objects.’ This converts the strokes into editable vector objects that can be easily combined.
Customization Options for Precision:
- Fine-Tuning with the Shape Tool: After creating a single curve, use the Shape tool to fine-tune individual nodes and segments. Click and drag nodes or segments to achieve pixel-perfect adjustments, enhancing precision in your design.
- Adjusting Line Properties: Tailor the appearance of your unified curve by adjusting line properties. Access the ‘Outline’ or ‘Pen’ settings in the ‘Object Properties’ docker to modify line thickness, color, and style for the entire curve.
- Snapping Options for Alignment: Utilize snapping options to ensure accurate alignment of the unified curve. Enable ‘Snap to Grid,’ ‘Snap to Guidelines,’ or ‘Snap to Objects’ to facilitate precise placement and maintain consistency.
Troubleshooting and Optimization Strategies:
- Handling Overlapping Strokes: If your strokes overlap in complex ways, use the ‘Trim’ or ‘Intersect’ tools to refine the resulting curve. These tools allow you to trim or retain specific areas based on overlapping regions.
- Node Editing for Precision: Leverage the Node Edit tool for intricate designs. Click on the unified curve, select the Node Edit tool, and refine the positions of individual nodes for precise control over the curve’s shape.
- Saving Iterations and Versions: Save iterations and versions of your design after unifying strokes. This safeguards your progress and allows you to revisit and build upon different stages of your project, fostering a non-linear and exploratory approach to design.
Conclusion:
Creating a single curve from strokes in CorelDRAW is a fundamental skill that streamlines your design process and enhances the cohesion of your artwork. By exploring the various techniques, customization options, and advanced tips presented in this comprehensive guide, you’ll gain the confidence to unify strokes with ease and precision. Whether you’re crafting illustrations, refining sketches, or designing complex shapes, CorelDRAW empowers you to create cohesive and polished designs within the dynamic world of vector graphics. Embrace the versatility of stroke unification, and let your creativity flourish on the digital canvas with the comprehensive tools CorelDRAW provides.


