Mastering Your Lock Screen: A Comprehensive Guide to Adding and Removing Cortana in Windows 10
Introduction
The lock screen in Windows 10 serves as a gateway to your digital realm, providing a glimpse of essential information and features even before you log in. Cortana, Microsoft’s intelligent virtual assistant, can be seamlessly integrated into this space, offering users a convenient way to access voice commands, reminders, and personalized information right from the lock screen. In this extensive guide, we will explore the significance of adding or removing Cortana from your lock screen in Windows 10, understand the capabilities of this integration, and provide detailed tutorials on both processes, empowering users to tailor their lock screen experience within the Windows 10 ecosystem.
Understanding the Importance of Cortana on the Lock Screen
Cortana on the lock screen enhances accessibility and convenience, allowing users to interact with their virtual assistant without unlocking their device. This integration transforms the lock screen into a dynamic space where users can receive voice commands, check the weather, set reminders, and access personalized information with a simple voice prompt. However, personal preferences and privacy concerns may lead users to choose whether to keep or remove Cortana from the lock screen, making it essential to understand the advantages and considerations of each option.
The Advantages of Adding Cortana to the Lock Screen
- Quick Access to Information: With Cortana on the lock screen, users can quickly access information, such as the weather, upcoming calendar events, and news, without the need to unlock their device.
- Voice Commands and Interactions: Integrating Cortana on the lock screen enables voice commands and interactions, providing a hands-free and convenient way to use the virtual assistant without accessing the full system.
- Personalized Reminders: Users can set and receive personalized reminders directly from the lock screen, helping them stay organized and on top of their tasks even before unlocking the device.
- Customizable Experience: Cortana on the lock screen offers a customizable experience, allowing users to tailor the information displayed and the level of interaction based on their preferences.
The Considerations of Removing Cortana from the Lock Screen
- Privacy Concerns: Some users may have privacy concerns about having Cortana accessible on the lock screen, especially if the device is used in shared or public spaces.
- Reduced Convenience: Removing Cortana from the lock screen may reduce the convenience of quick voice interactions and access to personalized information without unlocking the device.
- Security Considerations: For users who prioritize security, having Cortana on the lock screen may present a potential risk if unauthorized individuals gain physical access to the device.
Now, let’s explore the step-by-step processes for both adding and removing Cortana from the lock screen in Windows 10.
Adding Cortana to the Lock Screen:
Step 1: Open Cortana Settings
- Click on the Cortana icon in the taskbar or press the Windows key and type “Cortana” to open the Cortana settings menu.
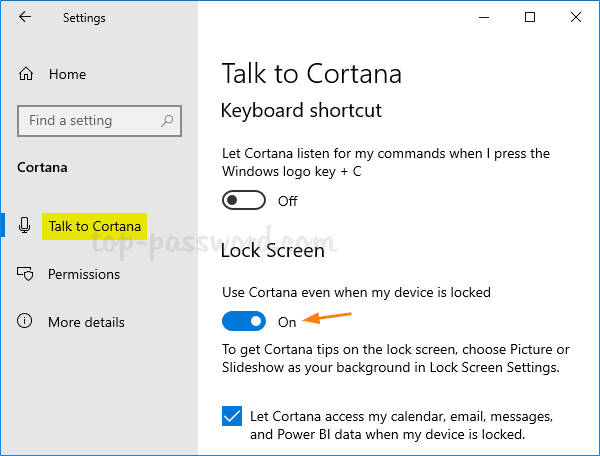
Step 2: Navigate to “Talk to Cortana” Settings
- Within the Cortana settings, navigate to the “Talk to Cortana” section. Here, you’ll find options related to how Cortana responds to voice commands and interactions.
Step 3: Enable “Let Cortana respond to ‘Hey Cortana’ even when my device is locked”
- Toggle on the switch for “Let Cortana respond to ‘Hey Cortana’ even when my device is locked.” This option allows Cortana to be accessible on the lock screen for voice interactions.
Step 4: Customize Additional Settings (Optional)
- Explore additional settings to customize the level of interaction and information Cortana provides on the lock screen. This may include choosing what information is displayed and adjusting privacy settings.
Step 5: Test Cortana on the Lock Screen
- With the settings configured, test Cortana on the lock screen by saying “Hey Cortana” followed by a voice command. Cortana should respond and provide the requested information or perform the specified task.
Removing Cortana from the Lock Screen:
Step 1: Open Cortana Settings
- Click on the Cortana icon in the taskbar or press the Windows key and type “Cortana” to open the Cortana settings menu.
Step 2: Navigate to “Talk to Cortana” Settings
- Within the Cortana settings, navigate to the “Talk to Cortana” section. Here, you’ll find options related to how Cortana responds to voice commands and interactions.
Step 3: Disable “Let Cortana respond to ‘Hey Cortana’ even when my device is locked”
- Toggle off the switch for “Let Cortana respond to ‘Hey Cortana’ even when my device is locked.” This option disables Cortana on the lock screen, restricting voice interactions until the device is unlocked.
Step 4: Confirm the Changes
- Confirm the changes, and Cortana will no longer be accessible on the lock screen for voice interactions.
Step 5: Test the Lock Screen Access
- Test the changes by attempting to use voice commands on the lock screen. Cortana should no longer respond to “Hey Cortana” until the device is unlocked.
Considerations and Tips:
- Security and Privacy: Consider your security and privacy preferences when deciding whether to add or remove Cortana from the lock screen. Assess the potential risks and benefits based on your usage patterns and preferences.
- Accessibility Features: For users with accessibility needs, having Cortana on the lock screen may provide valuable voice interaction features. Evaluate your specific requirements before making a decision.
- Device Usage Context: Consider the context in which you typically use your device. If it’s often used in shared or public spaces, you might prioritize privacy and security by removing Cortana from the lock screen.
- Regular Updates: Windows 10 receives regular updates, and features related to Cortana and lock screen settings may evolve. Keep your operating system up to date to access the latest enhancements and improvements.
Conclusion:
Customizing Cortana’s presence on the lock screen in Windows 10 is a strategic decision that aligns with users’ preferences regarding convenience, privacy, and security. By following the comprehensive step-by-step guide provided in this overview, users can seamlessly configure Cortana to enhance their lock screen experience, making it a tailored and personalized gateway to their digital world. As technology continues to advance, the flexibility to customize features like Cortana on the lock screen exemplifies Microsoft’s commitment to providing users with a versatile and user-centric operating system. Embrace the power of Cortana on the lock screen, or tailor it to meet your specific preferences, and let your lock screen become a gateway that aligns seamlessly with your digital lifestyle.


