Mastering the Art of Precision Editing: A Comprehensive Guide to Using the Edit Window in Pro Tools
Introduction:
The Edit Window in Pro Tools serves as the epicenter of creative control, providing a comprehensive workspace for recording, editing, and arranging audio and MIDI data with precision and efficiency. Whether you’re crafting intricate arrangements, fine-tuning performances, or sculpting sonic landscapes, mastering the use of the Edit Window is essential for unleashing your creativity in Pro Tools. In this exhaustive guide, we’ll explore every facet of using the Edit Window, from understanding its core elements to implementing advanced editing techniques, empowering you to harness its full potential and elevate your audio production endeavors.
Understanding the Edit Window:
Before diving into the specifics of using the Edit Window, let’s familiarize ourselves with its key components and functionalities:
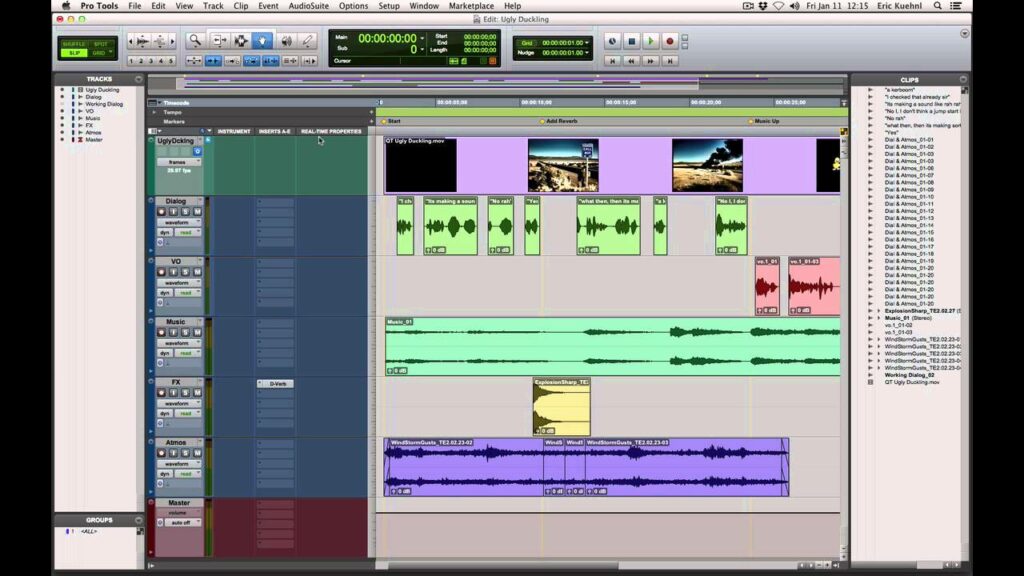
- Tracks and Regions: The Edit Window consists of audio and MIDI tracks, each containing regions representing recorded audio clips or MIDI notes. Tracks can be organized vertically and grouped into folders for easy navigation and management.
- Tools and Controls: The Edit Window features a variety of tools and controls for editing and manipulating audio and MIDI data. These include selection tools, editing tools (such as trim, fade, and slip), zoom controls, and transport controls for playback and recording.
- Timeline and Ruler: The timeline and ruler display the current position and duration of your session, allowing you to navigate and edit audio and MIDI data with precision. The ruler also displays markers, tempo changes, and other time-based information.
- Clip List and Memory Locations: The Clip List provides an overview of all audio and MIDI clips in your session, allowing you to quickly locate and manage clips. Memory locations allow you to mark and navigate to specific points in your session, such as verse/chorus sections or cue points.
Getting Started with the Edit Window:
Now that we’ve covered the basics, let’s explore how to navigate and use the Edit Window in Pro Tools:
- Navigating Tracks and Regions:
- Use the scroll bars and scroll wheel on your mouse to navigate vertically and horizontally within the Edit Window.
- Click and drag on the timeline ruler to move the playback cursor to a specific point in your session.
- Use keyboard shortcuts such as Command + [arrow keys] (macOS) or Ctrl + [arrow keys] (Windows) to scroll and navigate quickly through your session.
- Selecting and Editing:
- Use the selection tools to select audio and MIDI regions for editing. Click and drag to select a range of regions or use keyboard shortcuts for more precise selection.
- Use editing tools such as trim, fade, and slip to manipulate audio and MIDI data. Experiment with different editing techniques to achieve the desired result, such as adjusting levels, timing, and fades.
- Zooming and Scrolling:
- Zoom in and out on the timeline using the zoom controls or keyboard shortcuts such as Command + [+] (macOS) or Ctrl + [+] (Windows) to adjust the level of detail and precision.
- Use the zoom toggle button in the toolbar to toggle between zoom modes (horizontal, vertical, or both) for more flexibility in navigating and editing your session.
Advanced Editing Techniques:
Now that you’re familiar with the basics, let’s explore some advanced editing techniques to take your skills to the next level:
- Grid and Nudge Settings:
- Adjust the grid settings to snap audio and MIDI regions to the grid for precise alignment and quantization. Experiment with different grid resolutions to match the tempo and feel of your session.
- Use the nudge controls to move audio and MIDI regions by small increments, allowing for fine-tuning and micro-editing of timing and placement.
- Automation Editing:
- Use automation to control and automate parameters such as volume, pan, and plugin settings over time. Draw automation curves directly on the waveform or use automation modes to record automation in real-time.
- Experiment with automation shapes and curves to create dynamic and expressive changes in your mix, such as fades, swells, and filter sweeps.
- Grouping and Editing:
- Group related tracks together to edit them simultaneously, making it easier to maintain consistency and coherence across your session.
- Experiment with different editing modes and options for grouped tracks, such as relative and absolute editing, to achieve the desired result.
Integrating the Edit Window into Your Workflow:
As you become more comfortable with using the Edit Window, consider integrating it into your overall workflow in the following ways:
- Efficient Editing and Arranging:
- Use precise editing techniques to streamline editing and arranging tasks, such as cutting, copying, pasting, and moving regions within your session.
- Take advantage of advanced editing tools and techniques to achieve smooth transitions, seamless edits, and polished arrangements in your projects.
- Creative Exploration and Experimentation:
- Use the Edit Window as a canvas for creative exploration and experimentation, allowing you to sculpt and shape audio and MIDI data with precision and flair.
- Experiment with different editing techniques, automation curves, and plugin effects to create unique sounds, textures, and arrangements in your music.
- Collaboration and Workflow Optimization:
- Collaborate with other musicians, producers, and engineers by sharing sessions and collaborating in real-time using cloud collaboration features in Pro Tools.
- Optimize your workflow by customizing the Edit Window layout, preferences, and shortcuts to suit your preferences and streamline your creative process.
Conclusion:
The Edit Window in Pro Tools serves as a powerful and versatile workspace for recording, editing, and arranging audio and MIDI data with precision and efficiency. By mastering its tools, techniques, and workflows, you’ll be well-equipped to unleash your creativity and bring your musical visions to life in Pro Tools.
Whether you’re crafting intricate arrangements, fine-tuning performances, or exploring new sonic territories, the Edit Window provides the tools and flexibility you need to achieve your creative goals. So, dive in, explore, and let the boundless possibilities of the Edit Window inspire your audio production journey in Pro Tools.


