Mastering the Art of Navigation: A Comprehensive Guide to Navigating the Avid Pro Tools Interface
Introduction:
Avid Pro Tools stands as a cornerstone in the realm of professional audio production, offering a robust and feature-rich environment for recording, editing, mixing, and mastering music and audio. Central to the Pro Tools experience is its intuitive and powerful interface, which serves as the command center for all your creative endeavors. In this exhaustive guide, we’ll take a deep dive into navigating the Avid Pro Tools interface, empowering you to navigate with confidence and efficiency as you embark on your audio production journey.
Understanding the Avid Pro Tools Interface:
Before diving into the specifics of navigation, let’s familiarize ourselves with the key components and concepts of the Pro Tools interface:
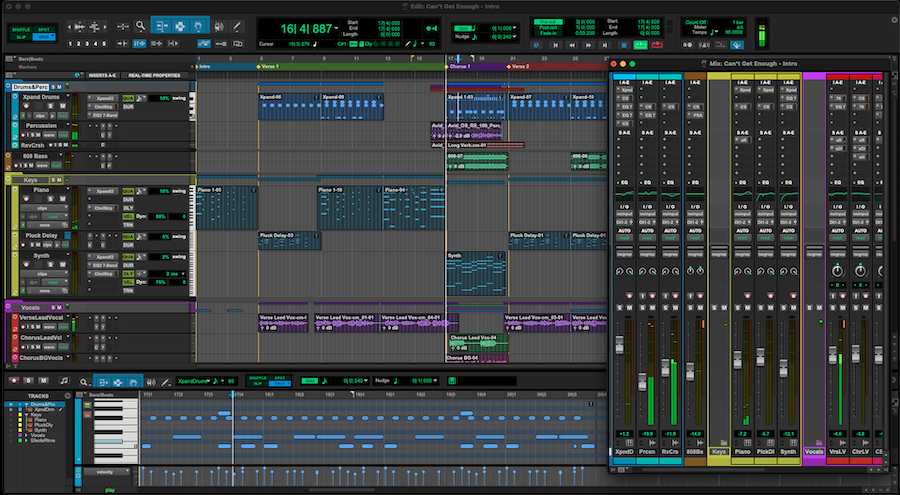
- Edit Window: The Edit window is the primary workspace in Pro Tools, where you’ll perform most of your recording, editing, and mixing tasks. It consists of tracks, regions, and various tools and controls for manipulating audio and MIDI data.
- Mix Window: The Mix window provides a comprehensive view of your session’s audio tracks, plugins, and routing. It allows you to adjust levels, apply effects, and configure routing and signal flow for mixing and mastering.
- Transport Controls: Located at the top of the interface, the transport controls allow you to play, stop, rewind, and record audio and MIDI tracks. They also provide access to features such as looping, punch recording, and automation modes.
- Toolbar: The toolbar contains a variety of tools and functions for editing, arranging, and manipulating audio and MIDI data. It includes tools for selecting, cutting, copying, pasting, and zooming in on regions, as well as controls for quantizing, nudging, and looping.
- Timeline and Ruler: The timeline and ruler display the current position and duration of your session, as well as markers, tempo changes, and other time-based information. You can navigate the timeline using the playback cursor and markers, as well as the zoom and scroll controls.
Getting Started with Navigation:
Now that we’ve covered the basics, let’s explore how to navigate the Avid Pro Tools interface with precision and ease:
- Navigating the Edit Window:
- Use the scroll bars and scroll wheel on your mouse to navigate vertically and horizontally within the Edit window.
- Click and drag on the timeline ruler to move the playback cursor to a specific point in your session.
- Use keyboard shortcuts such as Command + [arrow keys] (macOS) or Ctrl + [arrow keys] (Windows) to scroll and navigate quickly through your session.
- Switching Between Windows:
- Use the tabs at the top of the interface to switch between the Edit window, Mix window, and other views such as the MIDI Editor and Score Editor.
- Alternatively, use keyboard shortcuts such as Command + = (macOS) or Ctrl + = (Windows) to toggle between open windows and views.
- Customizing Views and Layouts:
- Customize the layout and appearance of the Pro Tools interface to suit your workflow and preferences.
- Resize and rearrange windows, panels, and controls to create a workspace that maximizes efficiency and productivity.
- Save and recall custom layouts using the Window menu or keyboard shortcuts to quickly switch between different configurations.
Advanced Navigation Techniques:
Now that you’re familiar with the basics, let’s explore some advanced navigation techniques to streamline your workflow:
- Navigating Tracks and Regions:
- Use the track list and track headers in the Edit window to navigate and organize your session’s audio and MIDI tracks.
- Click on a track name or track number to select the entire track, or click on a region to select it individually.
- Use keyboard shortcuts such as Tab (forward) and Shift + Tab (backward) to navigate between regions and tracks quickly.
- Zooming and Scrolling:
- Zoom in and out on the timeline using the zoom controls or keyboard shortcuts such as Command + [+] (macOS) or Ctrl + [+] (Windows) to adjust the level of detail and precision.
- Use the zoom toggle button in the toolbar to toggle between zoom modes (horizontal, vertical, or both) for more flexibility in navigating and editing your session.
- Navigating Markers and Memory Locations:
- Use markers and memory locations to navigate to specific points in your session, such as verse/chorus sections, song structures, or cue points.
- Create markers and memory locations using the Marker and Memory Locations windows or keyboard shortcuts to mark important points in your session and navigate between them quickly.
Integrating Navigation into Your Workflow:
As you become more comfortable with navigating the Avid Pro Tools interface, consider integrating these techniques into your overall workflow:
- Efficient Editing and Arranging:
- Use precise navigation techniques to streamline editing and arranging tasks, such as cutting, copying, pasting, and moving regions within your session.
- Navigate quickly between different sections of your session using markers and memory locations to maintain a smooth and efficient workflow.
- Smooth Mixing and Mastering:
- Navigate the Mix window with ease to adjust levels, apply effects, and configure routing for mixing and mastering your tracks.
- Use advanced navigation techniques to navigate between different tracks, groups, and aux sends, allowing for precise control over your session’s audio and automation.
- Creative Exploration and Experimentation:
- Use navigation techniques to explore and experiment with different ideas, arrangements, and sonic possibilities in your session.
- Quickly navigate between different views, layouts, and configurations to find the optimal setup for your creative process and workflow.
Conclusion:
Mastering the navigation of the Avid Pro Tools interface is essential for achieving efficiency, precision, and creativity in your audio production endeavors. By familiarizing yourself with the key components, techniques, and shortcuts outlined in this guide, you’ll be well-equipped to navigate with confidence and ease as you dive into the world of professional audio production with Pro Tools.
Whether you’re recording, editing, mixing, or mastering music and audio, efficient navigation is the key to unlocking the full potential of Pro Tools and bringing your creative visions to life. So, dive in, explore, and let the boundless possibilities of the Pro Tools interface inspire your musical journey.


