Unveiling Photoshop’s Artistry: Exploring the Photo Filter Trick to Extract Colors from Your Images
Introduction:
In the vast and dynamic realm of digital design, Adobe Photoshop stands as a beacon of creative possibility. Among its myriad features, the Photo Filter tool emerges as a versatile and often underappreciated gem. In this comprehensive guide, we embark on a journey to uncover the Photo Filter trick – a captivating technique that allows designers and digital artists to extract colors directly from their images. This innovative method not only streamlines color selection but also infuses an extra layer of cohesion and harmony into your creative compositions.
Understanding the Power of Photoshop’s Photo Filter:
- Versatility of Photo Filter: The Photo Filter in Photoshop serves as a powerful color adjustment tool, enabling users to enhance or modify the color balance of an entire image or specific elements within it.
- Creative Color Exploration: Beyond its traditional role, the Photo Filter harbors a hidden trick – the ability to extract and apply colors from your images. This opens the door to a world of creative possibilities, allowing you to harmonize color palettes effortlessly.
The Photo Filter Trick – A Step-by-Step Exploration:
Note: This tutorial assumes a basic familiarity with Adobe Photoshop. Ensure you have the latest version of Photoshop installed for optimal access to features.
- Open Your Image in Photoshop: Begin by launching Adobe Photoshop and opening the image from which you wish to extract colors. Familiarize yourself with the color palette of the image, paying attention to hues, tones, and contrasts.
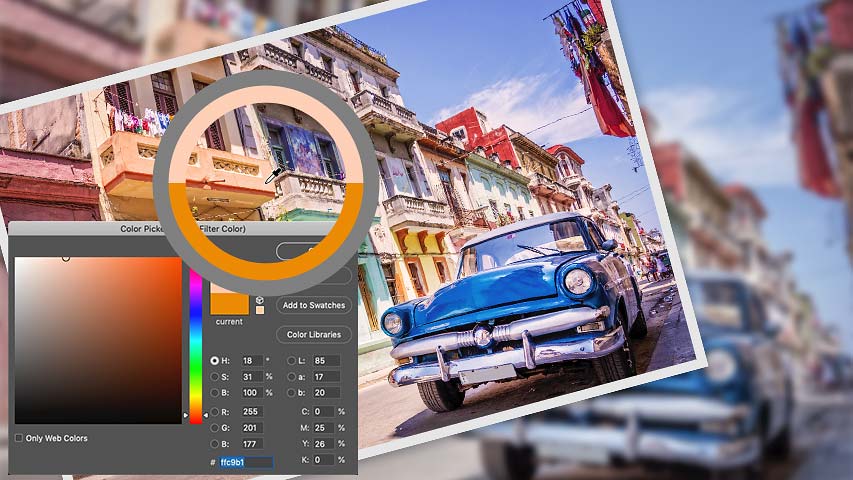
- Access the Photo Filter: Navigate to the “Layer” menu and select “New Adjustment Layer,” then choose “Photo Filter.” A dialog box will appear, presenting a range of filter options and settings.
- Select the “Custom Color” Option: In the Photo Filter dialog box, select the “Custom Color” option from the Filter dropdown menu. This allows you to manually input specific color values.
- Use the Eyedropper Tool: To extract colors from your image, click on the small box next to the “Color” option. This opens the Color Picker. Now, use the Eyedropper tool to sample colors directly from your image by clicking on the desired color in the image window.
- Adjust Opacity and Density: Fine-tune the intensity of the color extraction by adjusting the opacity and density sliders in the Photo Filter dialog box. This allows you to control the strength of the applied color effect.
- Experiment with Different Filters: Explore the various filters available in the Photo Filter dialog box. Experiment with warming or cooling filters, and observe how they interact with the colors extracted from your image. This experimentation adds depth and nuance to your color palette.
- Apply Multiple Photo Filters: To further enhance color complexity, consider applying multiple Photo Filters. Repeat the process by adding additional adjustment layers, each with its own custom color extracted from the image.
- Blend Modes and Opacity: Experiment with blend modes for the Photo Filter adjustment layers. Multiply and Overlay modes, for example, can create interesting interactions between the extracted colors and the underlying image. Adjust the opacity to achieve the desired balance.
Advanced Techniques for Creative Expression:
- Selective Color Extraction: For precise color extraction, create a selection using tools like the Magic Wand or Lasso tool before applying the Photo Filter. This allows you to focus on specific regions or elements within the image.
- Combining with Layer Masks: Incorporate layer masks to selectively apply the Photo Filter effect to specific areas. This provides granular control over color application, letting you guide the viewer’s focus within the composition.
- Dynamic Color Variations: Apply keyframes if working in a video or animation project. This enables dynamic color variations over time, enhancing the visual impact and creating a sense of movement within your design.
Practical Applications and Benefits:
- Brand Consistency: Extracting colors from a company logo or branding elements ensures a consistent color scheme throughout design projects, reinforcing brand identity.
- Artistic Cohesion: When creating digital art or illustrations, using the Photo Filter trick establishes a harmonious and cohesive color palette, elevating the overall aesthetic appeal.
- Efficient Color Sampling: Instead of manually selecting colors from an image, the Photo Filter trick streamlines the process, saving time and ensuring accuracy in color selection.
Challenges and Solutions:
- Maintaining Color Accuracy: To preserve color accuracy, ensure your monitor is calibrated correctly. Additionally, work in a color profile that suits your project requirements.
- Balancing Color Intensity: Experiment with opacity and blend modes to strike the right balance between the extracted colors and the underlying image. Adjust these settings iteratively for optimal results.
Conclusion:
The Photo Filter trick in Adobe Photoshop transcends a mere technique; it becomes a conduit for creative expression, allowing you to infuse your designs with the rich and harmonious colors drawn directly from your source images. As you explore this innovative approach, consider it not only as a practical tool but as a palette of artistic potential. Let the Photo Filter trick guide your color choices, breathe life into your digital canvases, and elevate your designs to new heights. With each click of the Eyedropper tool and adjustment of the opacity slider, witness the transformation of your creative vision into a vibrant symphony of colors, masterfully orchestrated in the realm of Photoshop’s endless possibilities.


