Mastering YouTube Export: A Comprehensive Guide to Exporting Video for YouTube in Adobe Premiere Pro
Introduction: In today’s digital age, YouTube has become a ubiquitous platform for sharing and consuming video content, with millions of users uploading videos every day. As a content creator, ensuring that your videos look their best on YouTube is essential for attracting viewers and engaging your audience. Adobe Premiere Pro, one of the leading video editing software, offers a range of tools and settings for exporting videos specifically optimized for YouTube. In this comprehensive guide, we’ll delve into the intricacies of exporting video for YouTube in Adobe Premiere Pro, exploring techniques, workflows, and expert tips to help you maximize the quality and visibility of your YouTube videos.
Understanding YouTube Export Settings in Adobe Premiere Pro: Before we dive into the practical aspects, let’s first understand the key export settings and considerations for YouTube videos in Adobe Premiere Pro. When exporting videos for YouTube, it’s essential to optimize various parameters such as resolution, bitrate, codec, and format to ensure optimal playback quality and compatibility with YouTube’s platform. Additionally, YouTube has specific guidelines and recommendations for video uploads, including aspect ratio, frame rate, and audio settings, which should be taken into account during the export process. By carefully configuring these settings in Adobe Premiere Pro, you can ensure that your videos look their best on YouTube and reach a wider audience.
Step-by-Step Guide to Exporting Video for YouTube in Adobe Premiere Pro:
- Editing and Finalizing Your Video: Before exporting your video for YouTube, ensure that your project is fully edited and finalized in Adobe Premiere Pro. Review the timeline, make any necessary adjustments, and ensure that all audio, video, and visual effects are in place.
- Setting the Sequence Settings: Confirm that your sequence settings in Adobe Premiere Pro match the resolution, frame rate, and aspect ratio of your final video output. Navigate to Sequence > Sequence Settings to adjust the sequence settings if necessary. For YouTube videos, the recommended resolution is typically 1920×1080 (1080p) or 3840×2160 (4K), with a frame rate of 24fps, 30fps, or 60fps.
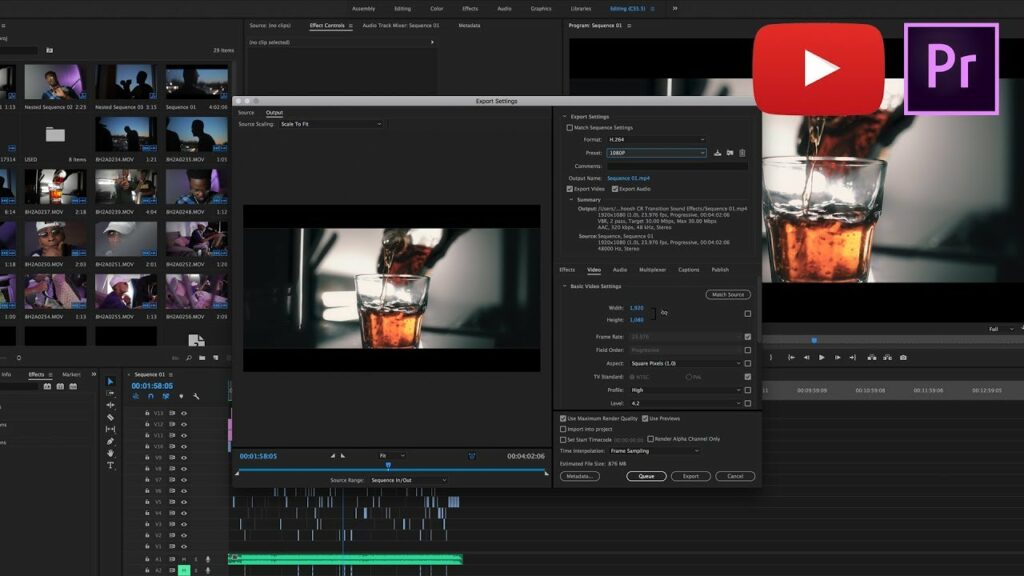
- Exporting Your Video: Once your video is ready for export, navigate to File > Export > Media to open the Export Settings window in Adobe Premiere Pro. This is where you’ll configure the export settings for your YouTube video.
- Selecting the Format and Preset: In the Export Settings window, start by selecting the format and preset for your YouTube video. For YouTube uploads, the recommended format is typically H.264, which offers high-quality compression and broad compatibility. Choose a preset that matches your desired resolution and frame rate, such as “YouTube 1080p HD” or “YouTube 4K Ultra HD.”
- Adjusting the Video Settings: Next, navigate to the Video tab in the Export Settings window to adjust the video settings for your YouTube video. Configure the video codec, bitrate, and profile settings to ensure optimal visual quality and compression. For YouTube uploads, the recommended bitrate settings are typically between 8 Mbps and 16 Mbps for 1080p videos and between 35 Mbps and 68 Mbps for 4K videos.
- Configuring the Audio Settings: In the Audio tab, configure the audio settings for your YouTube video. Ensure that the audio codec, sample rate, and bitrate settings are compatible with YouTube’s platform. The recommended audio settings for YouTube uploads are typically AAC codec with a sample rate of 48 kHz and a bitrate of 320 kbps.
- Setting the Output Name and Location: Specify the output name and location for your exported YouTube video in the Output Name field. Choose a descriptive filename and select a destination folder on your computer where the exported video will be saved.
- Checking the Export Summary: Before exporting your video, review the export summary at the bottom of the Export Settings window to ensure that all settings are configured correctly. Verify the format, preset, resolution, frame rate, bitrate, codec, and other parameters to avoid any compatibility or quality issues.
- Exporting Your Video: Once you’re satisfied with the export settings, click on the Export button to start exporting your video for YouTube in Adobe Premiere Pro. Depending on the duration and complexity of your video, the export process may take some time to complete.
- Uploading Your Video to YouTube: After exporting your video from Adobe Premiere Pro, navigate to the YouTube website or app to upload your video to your YouTube channel. Follow the on-screen instructions to select the video file, enter metadata such as title, description, tags, and privacy settings, and publish your video to YouTube.
Tips and Best Practices for Exporting Video for YouTube in Adobe Premiere Pro:
- Optimize for YouTube’s Recommendations: Refer to YouTube’s official recommendations and guidelines for video uploads, including aspect ratio, frame rate, resolution, bitrate, and audio settings. Adhering to these recommendations will ensure that your videos look their best on YouTube and are compatible with its platform.
- Use High-Quality Source Footage: Start with high-quality source footage when editing your videos in Adobe Premiere Pro. Use high-resolution cameras, professional audio equipment, and high-quality assets to ensure that your videos maintain visual and audio fidelity throughout the editing and export process.
- Test Your Export Settings: Before uploading your video to YouTube, test your export settings by previewing the exported video file on different devices and platforms. Pay attention to visual quality, playback performance, and compatibility to ensure that your video looks and sounds as intended.
- Experiment with Compression Settings: Experiment with different compression settings such as bitrate, codec, and profile to find the optimal balance between file size and visual quality for your YouTube videos. Consider the complexity of your video content and the target audience when adjusting compression settings.
- Optimize Metadata and Thumbnails: In addition to the video content itself, optimize metadata such as titles, descriptions, tags, and thumbnails to improve the discoverability and visibility of your YouTube videos. Use descriptive titles, relevant keywords, and eye-catching thumbnails to attract viewers and encourage engagement.
- Monitor Analytics and Feedback: Keep track of your YouTube analytics and viewer feedback to assess the performance and reception of your videos. Monitor metrics such as watch time, audience retention, likes, comments, and shares to identify areas for improvement and refine your content strategy.
Conclusion: Exporting video for YouTube in Adobe Premiere Pro is a critical step in the video production process, ensuring that your videos look their best and reach a wider audience on YouTube’s platform. By following the steps outlined in this comprehensive guide and embracing best practices, you’ll be well-equipped to optimize the quality, compatibility, and visibility of your YouTube videos. Whether you’re a content creator, filmmaker, vlogger, or marketer, Adobe Premiere Pro provides the tools and capabilities you need to create compelling and engaging videos for YouTube. So, dive in, experiment fearlessly, and let your creativity shine as you master the art of exporting video for YouTube in Adobe Premiere Pro.


