Mastering Visual Clarity: A Comprehensive Guide on How to Change the Screen Resolution in Windows 10
Introduction:
The visual display of your Windows 10 environment plays a crucial role in your overall computing experience. One key aspect that directly influences the clarity, crispness, and overall quality of your display is the screen resolution. Windows 10 provides users with a myriad of options to tailor their screen resolution to meet their preferences, device capabilities, and specific use cases. In this extensive guide, we will explore the intricacies of changing the screen resolution in Windows 10, covering various methods, considerations, and tips for optimizing your visual experience.
1. Understanding Screen Resolution: A Crucial Visual Element
Screen resolution refers to the number of pixels displayed on the screen horizontally and vertically. It directly impacts the clarity, sharpness, and overall visual quality of the content on your display. Choosing the right screen resolution ensures that text, images, and interface elements appear crisp and well-defined, contributing to a comfortable and immersive computing experience.
2. Accessing Display Settings: The Gateway to Screen Resolution Adjustment
To change the screen resolution in Windows 10, the primary point of access is the Display Settings menu. To open Display Settings:
- Right-click on the desktop and select “Display settings” from the context menu.
- Alternatively, press Win + I to open the Settings menu, go to “System,” and then click on “Display.”
In the Display Settings menu, you’ll find a variety of options to customize your screen, including screen resolution.
3. Choosing the Right Resolution: Finding the Perfect Balance
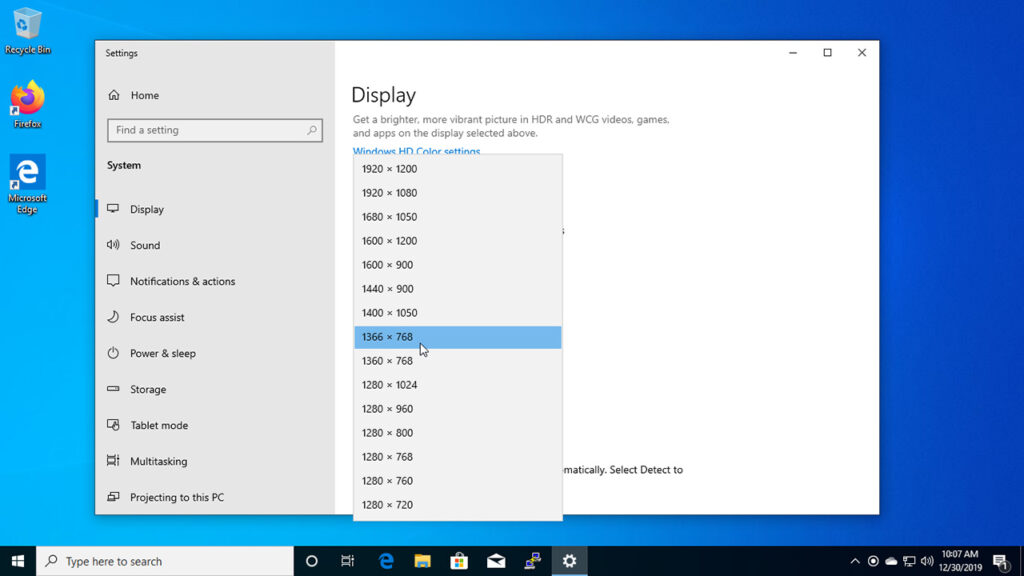
Within the Display Settings menu, locate the “Resolution” drop-down menu. Click on the menu to reveal a list of available resolutions. It’s essential to strike a balance between clarity and the number of items displayed on the screen. Higher resolutions provide sharper visuals but may make text and icons smaller, while lower resolutions may result in larger text and icons but reduced clarity.
4. Recommended Resolution: Windows 10’s Suggested Setting
Windows 10 often detects and recommends an optimal resolution based on your monitor’s capabilities. In the Display Settings menu, look for the “Recommended” label next to a specific resolution. Selecting the recommended resolution ensures that your display operates at its native capabilities, providing the best balance between clarity and content size.
5. Advanced Display Settings: Fine-Tuning for Precision
For users who prefer more granular control over their display settings, Windows 10 offers the Advanced Display Settings menu. To access this menu:
- In the Display Settings menu, scroll down and click on “Advanced display settings.”
- Here, you can view additional information about your display and select specific resolutions not listed in the standard menu.
Advanced Display Settings are beneficial for users who want to fine-tune their screen resolution based on precise preferences or specific application requirements.
6. Graphics Control Panel: Manufacturer-Specific Options
Graphics card manufacturers often provide control panels with additional customization options, including screen resolution settings. For example, NVIDIA and AMD users can access their respective control panels to adjust screen resolution, color profiles, and other display-related parameters. To access the control panel:
- Right-click on the desktop and select “NVIDIA Control Panel” or “AMD Radeon Settings,” depending on your graphics card.
Manufacturer-specific control panels are particularly useful for users who want to explore advanced graphics settings beyond what Windows 10 provides.
7. Command-Line Interface: Advanced Users and Automation
For advanced users or system administrators, Windows 10 allows screen resolution adjustments through the command-line interface. Open Command Prompt or PowerShell and use the following command:
Get-WmiObject -Namespace root/WMI -Class WmiMonitorBasicDisplayParams | ForEach-Object { $_.Active | ForEach-Object { $_.HorizontalResolution } }
This command displays the current horizontal resolution. To change it, replace “HorizontalResolution” with “VerticalResolution” and use the desired values. This method is suitable for users who prefer command-line interfaces or need to automate screen resolution adjustments.
8. Multiple Displays: Dual Monitors and Beyond
Windows 10 accommodates users with multiple displays, allowing for individualized screen resolution settings for each monitor. In the Display Settings menu, under the “Select and rearrange displays” section, choose the desired monitor and adjust its resolution independently. This feature is beneficial for users with dual monitors or other multi-display setups.
Conclusion: Tailoring Your Visual Experience in Windows 10
In conclusion, changing the screen resolution in Windows 10 is a fundamental aspect of customizing your visual experience to meet your preferences and specific requirements. Whether you opt for the user-friendly Display Settings menu, explore advanced options in the Advanced Display Settings or manufacturer-specific control panels, or utilize command-line interfaces for precision and automation, Windows 10 caters to users of all levels of expertise. By incorporating these methods into your routine, you can seamlessly tailor your screen resolution, ensuring a clear, comfortable, and visually pleasing computing experience in the dynamic and diverse world of Windows 10.


