Mastering the Reeded Glass Effect in Photoshop: An Extensive Tutorial
James March 20, 2024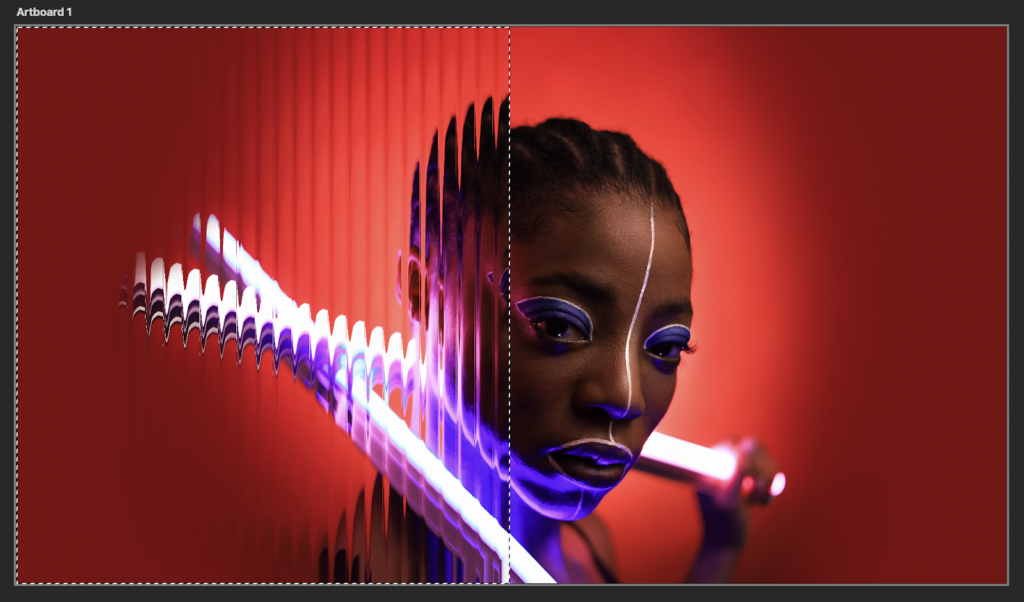
Introduction:
In the realm of digital design and visual artistry, the reeded glass effect stands as a captivating technique that adds texture, depth, and a touch of elegance to images and compositions. Inspired by the timeless beauty of textured glass, this effect simulates the appearance of light passing through ridged or patterned surfaces, creating a mesmerizing interplay of light and shadow. Whether used in web design, digital art, or photo manipulation, mastering the reeded glass effect in Photoshop offers designers and artists a versatile tool for adding sophistication and visual interest to their creations. In this comprehensive tutorial, we will explore step-by-step techniques, expert tips, and creative strategies to master the art of reeded glass effect in Photoshop.
Understanding the Reeded Glass Effect:
The reeded glass effect is characterized by the replication of the textured appearance of ridged or patterned glass surfaces. This effect creates a sense of depth and dimensionality, with light filtering through the ridges and casting shadows, resulting in a visually intriguing and dynamic composition. By leveraging techniques such as layer styles, filters, and blending modes, designers can achieve stunning results that evoke the timeless elegance of textured glass.
Now, let’s delve into the step-by-step process of creating the reeded glass effect in Photoshop:
Step 1: Setting Up the Document:
Begin by opening Adobe Photoshop and creating a new document with dimensions suitable for your design project. Choose a resolution and color mode appropriate for your intended output, such as print or digital display.
Step 2: Adding the Base Image:
Import the base image or background onto which you want to apply the reeded glass effect. This could be a photograph, digital artwork, or any other image that will serve as the foundation for the effect.
Step 3: Creating the Reeded Glass Texture:
To create the reeded glass texture, start by creating a new layer above the base image. Select the Rectangular Marquee tool (M) from the toolbar and draw a series of parallel lines or rectangles to represent the ridges of the reeded glass texture.
Step 4: Applying Layer Styles:
With the selection still active, go to Layer > Layer Style > Stroke from the top menu. In the Stroke dialog box, adjust the settings to create a thin stroke along the selection to represent the ridges of the reeded glass texture. Experiment with different stroke widths and colors to achieve the desired effect.
Step 5: Adding Blur:
To simulate the diffusion of light through the reeded glass texture, apply a Gaussian Blur filter to the texture layer. Go to Filter > Blur > Gaussian Blur from the top menu and adjust the radius setting to create a subtle blur effect that softens the edges of the ridges.
Step 6: Adjusting Opacity:
Lower the opacity of the reeded glass texture layer to achieve the desired level of transparency and diffusion. This step is crucial for creating the illusion of light passing through the textured glass surface, adding depth and dimension to the composition.
Step 7: Blending Modes:
Experiment with different blending modes for the reeded glass texture layer to achieve interesting and unique effects. Overlay, Soft Light, and Screen blending modes often work well for blending the texture with the underlying layers while preserving the luminosity and texture of the effect.
Step 8: Adding Highlights and Shadows:
To further enhance the realism and depth of the reeded glass effect, create highlights and shadows that mimic the interplay of light and shadow on textured glass surfaces. Use techniques such as dodge and burn, as well as painting with white and black brushes, to add highlights and shadows along the ridges of the texture.
Step 9: Fine-Tuning and Refining:
Take the time to fine-tune and refine the reeded glass effect to achieve the desired look and feel. Experiment with adjusting the opacity, blur radius, and blending modes to enhance the texture and diffusion of light. Pay attention to details such as contrast, texture, and lighting to create a cohesive and visually striking composition.
Step 10: Final Touches and Exporting:
Once you’re satisfied with the reeded glass effect and overall composition, take the time to make any final adjustments or refinements to the design. Fine-tune the colors, contrast, and overall atmosphere to ensure that the effect enhances the mood and aesthetic of the artwork. When you’re happy with the final result, save your work and export the design in a high-quality format suitable for your intended use.
Advanced Techniques and Tips:
In addition to the basic steps outlined above, consider exploring advanced techniques and tips to further enhance the reeded glass effect:
- Texture Overlay: Experiment with incorporating texture overlays or pattern fills to add depth and visual interest to the reeded glass effect. Textures such as grunge, paper, or fabric can enhance the realism and texture of the glass surface, adding to the overall impact of the effect.
- Color Grading: Use color grading techniques to adjust the overall color tone and mood of the design. Experiment with adjustment layers such as Hue/Saturation, Color Balance, or Gradient Map to create subtle shifts in color that complement the reeded glass effect and enhance the overall atmosphere.
- Custom Brushes: Create custom brushes to add unique and personalized elements to the reeded glass effect. Experiment with brushes that mimic scratches, smudges, or imperfections on glass surfaces to add authenticity and detail to the texture.
- Layer Masking: Use layer masking to selectively reveal or conceal parts of the reeded glass texture, allowing for precise control over the appearance and blending of the effect with the background or other elements. This technique can be particularly useful for creating subtle transitions and adding depth to the design.
Conclusion:
In conclusion, mastering the reeded glass effect in Photoshop offers designers and artists a powerful and versatile tool for adding texture, depth, and elegance to their compositions. By following the step-by-step techniques outlined in this tutorial and exploring advanced techniques and tips, you can unleash your creativity and produce stunning artworks that captivate viewers and evoke emotions. Whether used in digital art, web design, or photo manipulation, the reeded glass effect offers endless possibilities for expression and experimentation. Embrace the beauty and sophistication of textured glass surfaces, and let your imagination soar as you create mesmerizing designs that transport viewers to a world of timeless elegance and visual intrigue.


