Mastering the Art of Screen Capture: A Comprehensive Guide to Taking Screenshots on PC
Introduction:
In the digital age, capturing and sharing the content displayed on your computer screen is an essential skill. Whether you’re creating tutorials, troubleshooting, or simply saving memorable moments, knowing how to take screenshots on your PC is a fundamental aspect of navigating the digital landscape. This comprehensive guide explores various methods and tools available for taking screenshots on PC, offering detailed insights into the diverse approaches to capturing your screen.
I. Understanding the Basics of Screenshots:
A. Definition:
- A screenshot, also known as a screen capture or screen grab, is a digital image that captures the contents of a computer or mobile device screen. Screenshots are a versatile tool used for documentation, communication, and creative expression.
- Use Cases: Screenshots find applications in diverse scenarios, including capturing software interfaces, saving online content, illustrating presentations, and troubleshooting technical issues.
B. Common Types of Screenshots:
- Full Screen: Captures the entire content visible on the screen, including open windows, the taskbar, and desktop background.
- Selected Area: Allows users to choose a specific area on the screen for capture, providing precision and control.
- Window Capture: Grabs the content within a specific application window, excluding other elements on the screen.
- Scrollable Screenshots: Useful for capturing content that extends beyond the visible screen, such as web pages or lengthy documents.
II. Native Methods for Taking Screenshots on Windows:
A. Snipping Tool:
- Overview: Snipping Tool is a built-in screenshot utility in Windows that offers basic screen capture features.
- Steps for Capture: a. Open Snipping Tool. b. Select the desired snip type (Free-form, Rectangular, Window, or Full-screen). c. Capture the screen area. d. Edit and save the snip.
B. Snip & Sketch:
- Introduction: Snip & Sketch is an evolution of the Snipping Tool, offering enhanced features for capturing and annotating screenshots.
- Steps for Capture: a. Press the Windows key + Shift + S to open the snipping bar. b. Choose a snipping mode (Rectangular, Freeform, Window). c. Capture the screen area. d. Annotate and save the screenshot.
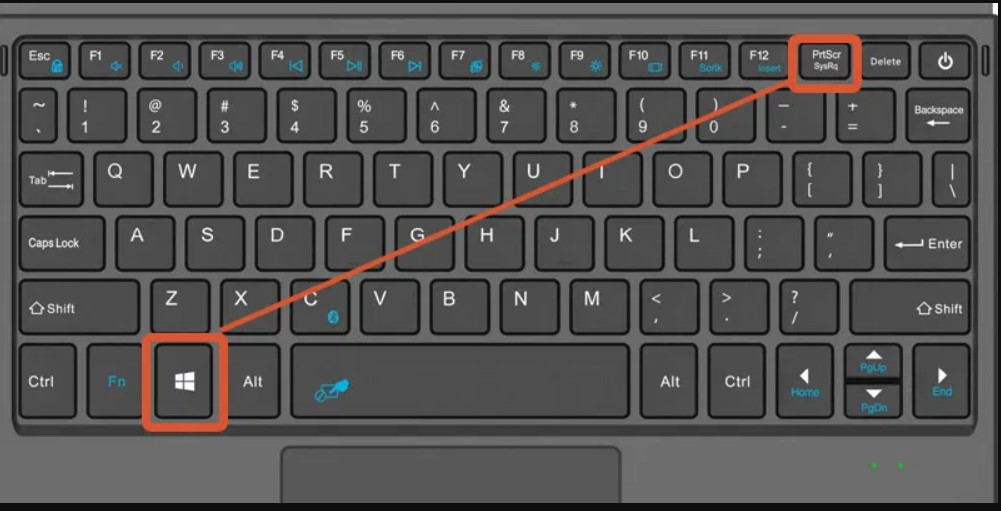
C. Print Screen (PrtScn) Key:
- Overview: The Print Screen key is a classic method for taking screenshots on Windows systems.
- Methods: a. PrtScn: Captures the entire screen. Pressing Alt + PrtScn captures the active window. b. Windows + Shift + S: Opens Snip & Sketch, allowing users to capture a selected area.
D. Windows + Print Screen:
- Overview: Captures the entire screen and automatically saves the screenshot as an image file.
- Steps: a. Press Windows + PrtScn. b. Locate the screenshot in the Screenshots folder in the Pictures library.
III. Native Methods for Taking Screenshots on macOS:
A. Command + Shift + 3:
- Overview: A keyboard shortcut that captures the entire screen and saves the screenshot as a file on the desktop.
- Steps: a. Press Command + Shift + 3. b. Locate the screenshot file on the desktop.
B. Command + Shift + 4:
- Overview: Activates a crosshair cursor for selecting a specific area of the screen to capture.
- Steps: a. Press Command + Shift + 4. b. Drag the crosshair to select the desired area. c. Release to capture the selected area.
C. Command + Shift + 4 + Spacebar:
- Overview: Captures a specific window or menu.
- Steps: a. Press Command + Shift + 4. b. Press the Spacebar. c. Click on the window or menu to capture.
IV. Snipping Tools and Utilities:
A. Snagit:
- Overview: Snagit is a versatile screenshot and screen recording tool that provides advanced features for capturing, editing, and sharing content.
- Features: a. Full-screen and region capture. b. Annotation and editing tools. c. GIF and video capture. d. Output to various formats.
B. Lightshot:
- Overview: Lightshot is a lightweight and user-friendly screenshot tool with simple editing capabilities.
- Features: a. Selectable capture area. b. Annotation and highlighting tools. c. Instant sharing to social media. d. Available as a browser extension.
C. Greenshot:
- Overview: Greenshot is an open-source screenshot tool that offers a balance between simplicity and functionality.
- Features: a. Region, window, and full-screen capture. b. Annotation and editing tools. c. Export options to various formats. d. Integration with other tools.
D. Snipaste:
- Overview: Snipaste is a versatile screenshot tool that excels in flexibility and customization.
- Features: a. Customizable capture area. b. Built-in image editor. c. Floating screenshot toolbar. d. Cross-platform support.
V. Browser Extensions for Screenshots:
A. Awesome Screenshot:
- Overview: A browser extension that enables users to capture, annotate, and share screenshots directly from the browser.
- Features: a. Full-page capture. b. Annotation and blurring tools. c. Direct sharing to cloud services. d. Available for popular browsers.
B. Nimbus Screenshot:
- Overview: A browser extension with comprehensive screenshot features, including annotation, cropping, and direct sharing.
- Features: a. Full-page and selective area capture. b. Editing tools and annotations. c. Direct upload to Nimbus Note cloud.
VI. Advanced Techniques and Tools:
A. Command-Line Capture (Windows):
- Overview: Using the built-in command-line utility, users can take screenshots and save them to a specified location.
- Example:bash
SnippingTool.exe /clip
B. Using External Cameras:
- Overview: Some users may resort to capturing screenshots using external devices, such as smartphones or cameras.
- Considerations: a. Consistency in image quality. b. Alignment and framing considerations. c. Manual transfer of images to the computer.
C. OCR and Text Extraction:
- Overview: Optical Character Recognition (OCR) tools can be used to extract text from screenshots.
- Tools: a. Adobe Acrobat. b. Google Drive. c. Online OCR services.
VII. Best Practices for Taking Screenshots:
A. Choose the Right Tool:
- Consider the nature of the content and your specific requirements when selecting a screenshot tool.
- Match the tool’s capabilities to the complexity of the task, ensuring an optimal workflow.
B. Understand Keyboard Shortcuts:
- Familiarize yourself with the native keyboard shortcuts for taking screenshots on your operating system.
- Learn additional keyboard shortcuts specific to third-party tools to enhance efficiency.
C. Annotate and Edit:
- Leverage annotation and editing features to enhance the clarity and communicative power of your screenshots.
- Use arrows, text boxes, and highlighting to draw attention to specific elements.
D. Organize and Store:
- Establish a systematic approach to organizing and storing your screenshots for easy retrieval.
- Utilize folders, naming conventions, and tagging to streamline the management of screenshot files.
E. Consider Privacy and Security:
- Exercise caution when capturing and sharing screenshots that may contain sensitive information.
- Review and redact any sensitive content before sharing screenshots, especially in professional or public contexts.
Conclusion:
Mastering the art of taking screenshots on your PC is an invaluable skill that empowers you to capture, communicate, and share information effectively. Whether you opt for native tools, third-party applications, or browser extensions, understanding the diverse methods and techniques available enhances your ability to navigate the digital landscape with confidence. From basic screen captures to advanced features like annotation and text extraction, the world of screenshots offers a myriad of possibilities for users seeking to express themselves, troubleshoot, or document their digital experiences. As technology evolves, so too will the tools and techniques for capturing and sharing the visual narratives of our digital journeys.


