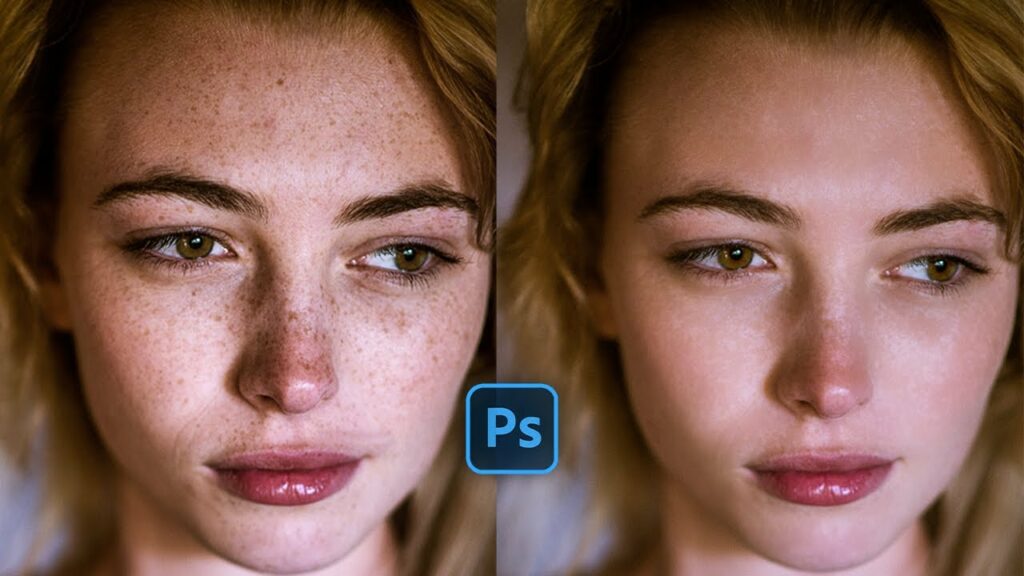
Mastering the Art of Photo Retouching: A Comprehensive Guide to Removing Freckles in Photoshop
Introduction:
Photo retouching is a powerful tool that allows photographers and digital artists to enhance the appearance of their images, achieving a polished and professional look. In this comprehensive guide, we will delve into the specific technique of removing freckles in Photoshop. While freckles are often celebrated as unique features, there are instances where clients or personal preferences may call for their reduction or removal. This tutorial aims to provide a step-by-step process, addressing the nuances of freckle removal while preserving the natural beauty of the subject.
Section 1: Understanding Freckles and Their Aesthetic Impact
Freckles are small, pigmented spots on the skin, often more prominent in fair-skinned individuals. While many people embrace freckles as distinctive and charming features, there are situations where clients or models may request their reduction for specific projects or personal preferences.
It’s essential to approach freckle removal with sensitivity, respecting the individual’s unique features while addressing their specific requests. Striking a balance between enhancement and preservation of natural characteristics is key to successful photo retouching.
Section 2: Importing the Image into Adobe Photoshop
Begin the freckle removal process by importing the image into Adobe Photoshop. Ensure that the image is in a suitable resolution for detailed retouching. Create a duplicate layer to work non-destructively, allowing for adjustments without affecting the original image.
Section 3: Zooming In for Precision
To effectively remove freckles, zoom in on the areas of the image where freckles are present. This enables precise retouching and ensures that the adjustments seamlessly blend with the surrounding skin tones.
Section 4: Choosing the Right Retouching Tool
Adobe Photoshop offers various retouching tools for different purposes. The Clone Stamp tool, Healing Brush tool, and Spot Healing Brush tool are commonly used for freckle removal. Each tool has its strengths, and selecting the appropriate one depends on the context and desired outcome.
Subsection 4.1: Clone Stamp Tool
The Clone Stamp tool allows you to sample pixels from one area of the image and replicate them in another. This tool is effective for removing freckles by blending the surrounding skin tones.
Subsection 4.2: Healing Brush Tool
The Healing Brush tool is similar to the Clone Stamp tool but offers automatic blending. It’s useful for maintaining a natural texture while reducing the appearance of freckles.
Subsection 4.3: Spot Healing Brush Tool
The Spot Healing Brush tool is a quick and automated option for freckle removal. It analyzes the surrounding pixels and intelligently blends them to achieve a seamless result. This tool is particularly useful for small and isolated freckles.
Section 5: Sampling and Blending
When using the Clone Stamp or Healing Brush tools, it’s crucial to sample pixels from nearby areas with similar skin tones. Adjust the brush size to match the size of the freckle for precise sampling and blending. Frequent sampling ensures that the retouching maintains a natural and consistent appearance.
Section 6: Retouching with Care
Retouching should be approached with care to avoid over-editing and unnatural results. Freckle removal is often about subtle reduction rather than complete elimination. Maintain the natural contours and variations in the skin to preserve a genuine and lifelike appearance.
Section 7: Using Layer Masks for Selective Retouching
To achieve selective freckle removal, consider using layer masks. This allows you to apply retouching only to specific areas while preserving others. Create a layer mask and use a soft brush to paint over the areas where freckle removal is desired. Adjust the opacity of the layer to control the intensity of the retouching.
Section 8: Checking for Consistency
Regularly zoom out and review the entire image to ensure a consistent and natural-looking result. Freckle removal should enhance the overall appearance without drawing attention to the retouched areas. Pay attention to lighting, shadows, and skin texture to maintain a cohesive look.
Section 9: Final Adjustments with Adjustment Layers
To further refine the overall image, consider adding adjustment layers. Use tools such as Curves or Levels to adjust the tonal range and ensure a balanced and well-exposed photograph. These adjustments contribute to the final polished appearance of the image.
Section 10: Exporting the Retouched Image
Once satisfied with the freckle removal and overall retouching, save your Photoshop project file (.PSD) to retain all layers for future edits. Export the final retouched image in a suitable format, such as JPEG or PNG, for sharing, printing, or client delivery.
Section 11: Ethical Considerations in Freckle Removal
While photo retouching is a valuable skill, it’s essential to approach it ethically. Be transparent with clients or subjects about the extent of retouching, and seek their input on the desired level of enhancement. Respect individual features and preferences, and avoid perpetuating unrealistic beauty standards.
Section 12: Showcasing Your Retouching Skills
Celebrate your mastery of photo retouching by showcasing your before-and-after images. Share your work on photography platforms, social media, or incorporate it into your portfolio. Engage with the photography community, seek constructive feedback, and let your retouched images stand as a testament to your skill in enhancing natural beauty.
Conclusion:
Photo retouching, when done with skill and sensitivity, can enhance the overall aesthetic of an image. Freckle removal, while a specific technique, requires an understanding of individual preferences and ethical considerations. By following the steps outlined in this comprehensive guide, you can master the art of removing freckles in Photoshop, achieving results that are both visually appealing and respectful of natural features. May your retouching endeavors contribute to the celebration of diverse beauty and the artistry of photography.


