Mastering the Art of Cloning: A Comprehensive Guide on How to Create a Clone Effect in After Effects
Introduction: The clone effect is a popular visual effect used in filmmaking and video production to create multiple copies of a subject or character within a scene. Whether you’re looking to create a crowd scene, duplicate a character, or produce an eye-catching visual effect, mastering the clone effect in Adobe After Effects offers endless creative possibilities. In this comprehensive guide, we will explore the step-by-step process of creating a clone effect in After Effects, from planning and shooting the footage to compositing and animating multiple clones for professional-quality results.
Understanding the Clone Effect: The clone effect involves duplicating a subject or character within a scene to create the illusion of multiple identical individuals. This effect can be achieved through careful planning and execution during the filming process, as well as through digital compositing and animation techniques in After Effects. By combining multiple layers of footage, masking, and keyframe animation, you can seamlessly integrate clones into a scene and create visually stunning effects that captivate your audience’s attention.
Step 1: Planning and Shooting the Footage Before diving into After Effects, it’s essential to plan and shoot the footage for your clone effect carefully. Start by determining the composition and framing of the shot, as well as the placement and movement of the clones within the scene. Consider factors such as lighting, camera angles, and perspective to ensure consistency and realism in the final result. When shooting the footage, use a tripod or stabilizer to maintain a steady shot, and mark the positions of the clones to guide the actors’ movements and interactions.
Step 2: Importing Footage into After Effects Once you’ve shot the footage for your clone effect, import the video files into After Effects by clicking on the File menu and selecting Import > File. Navigate to the location of the video files on your computer and select the desired files, then click Import to import them into the After Effects project. Alternatively, you can drag and drop the video files directly into the project panel in After Effects.
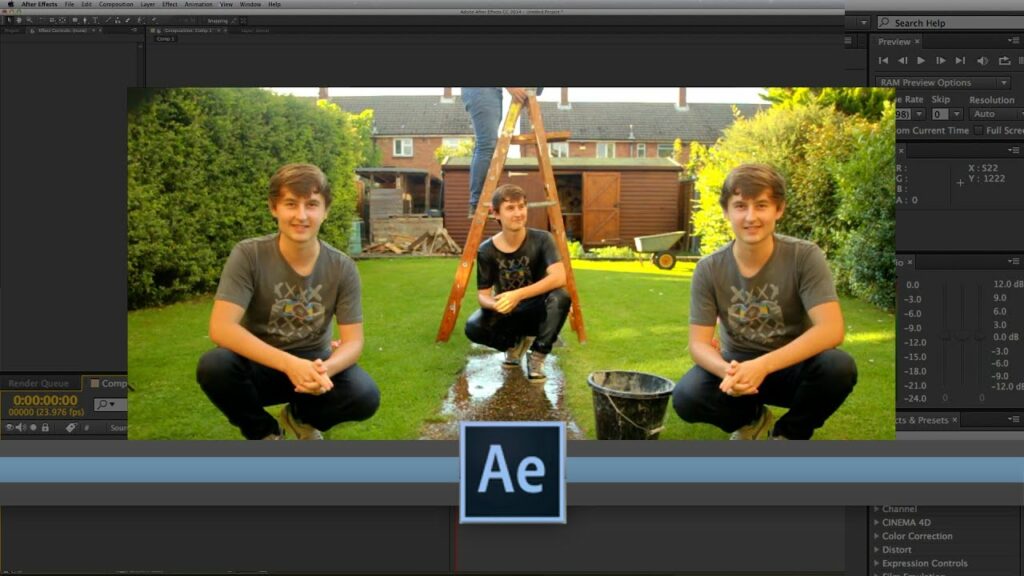
Step 3: Duplicating and Masking the Footage With the footage imported into After Effects, create duplicate layers of the video clips for each clone you want to create. To do this, select the video layer in the timeline, then right-click and choose Duplicate from the context menu. Repeat this process for each clone you want to add to the scene. Next, use the masking tools in After Effects to create masks around each clone in the duplicated layers. Use the Pen tool or the Shape tool to draw masks around the areas of the frame where each clone appears, ensuring that the masks align with the movement and positioning of the clones in the scene.
Step 4: Animating the Clones After creating masks for each clone, use keyframe animation to animate the position, scale, rotation, and opacity of the duplicated layers to match the movement and interactions of the clones in the scene. Select the duplicate layer in the timeline, then press the P key to reveal the Position property. Set keyframes for the Position property at the beginning and end of the clip to animate the movement of the clone. Repeat this process for other properties such as Scale, Rotation, and Opacity to create lifelike movements and transitions for the clones.
Step 5: Refining the Clone Effect Once you’ve animated the clones, preview the composition in After Effects to assess the overall look and feel of the clone effect. Make any necessary adjustments or refinements to the positioning, timing, or movement of the clones to ensure consistency and realism in the final result. This could include fine-tuning the masks, adjusting the timing of keyframes, or adding motion blur effects to enhance the realism of the clone effect. Continuously iterate and refine the clone effect until you achieve the desired look and feel for the final result.
Step 6: Adding Additional Visual Effects (Optional) To further enhance the clone effect or achieve a specific look or style, consider adding additional visual effects or elements to the composition in After Effects. This could include color grading, lighting effects, particle simulations, or other stylistic effects that complement the clone effect and enhance the overall visual appeal of the scene. Experiment with different combinations of effects and adjustments to create unique and visually compelling results that captivate your audience’s attention.
Step 7: Previewing and Exporting the Final Result After applying and refining the clone effect, preview the final composition in After Effects to ensure that it meets your expectations and requirements. Make any final adjustments or refinements as needed. Once you’re satisfied with the result, export the composition from After Effects to share or use in your video projects. Navigate to the Composition menu, select Add to Render Queue, and choose the desired render settings, including format, resolution, and output destination. Click Render to export the composition with the clone effect applied and save it to your desired destination.
Tips and Best Practices:
- Plan and shoot the footage for your clone effect carefully, paying attention to composition, framing, and lighting to ensure consistency and realism in the final result.
- Use a tripod or stabilizer to maintain a steady shot when shooting the footage, and mark the positions of the clones to guide the actors’ movements and interactions.
- Take advantage of After Effects’ masking and keyframe animation tools to create lifelike movements and transitions for the clones.
- Experiment with different visual effects and adjustments to enhance the clone effect and create unique and visually compelling results.
- Preview the clone effect on different displays and playback devices to ensure consistency and compatibility across various viewing environments.
Conclusion: Creating a clone effect in After Effects is a creative and rewarding process that allows you to bring your artistic vision to life and captivate your audience’s attention with visually stunning effects. By following the step-by-step process outlined in this guide and experimenting with different techniques and settings, you can achieve professional-quality results that elevate the overall quality and impact of your video projects. Whether you’re editing narrative films, music videos, or promotional content, After Effects offers powerful tools and features for creating clone effects that enhance the visual storytelling and immerse viewers in the world of your imagination.


