Mastering Saturation Masks: Unleashing the Power of HSB/HSL Filters in Photoshop
Saturation masks are a versatile tool in the realm of digital image editing, allowing for precise control over color saturation levels. Among the myriad of techniques available in Photoshop, the HSB/HSL filter method stands out as a powerful and nuanced approach to creating saturation masks. In this extensive guide, we embark on a journey through the intricacies of Photoshop, unveiling the step-by-step process of utilizing the HSB/HSL filter to craft saturation masks that elevate your editing capabilities to new heights.
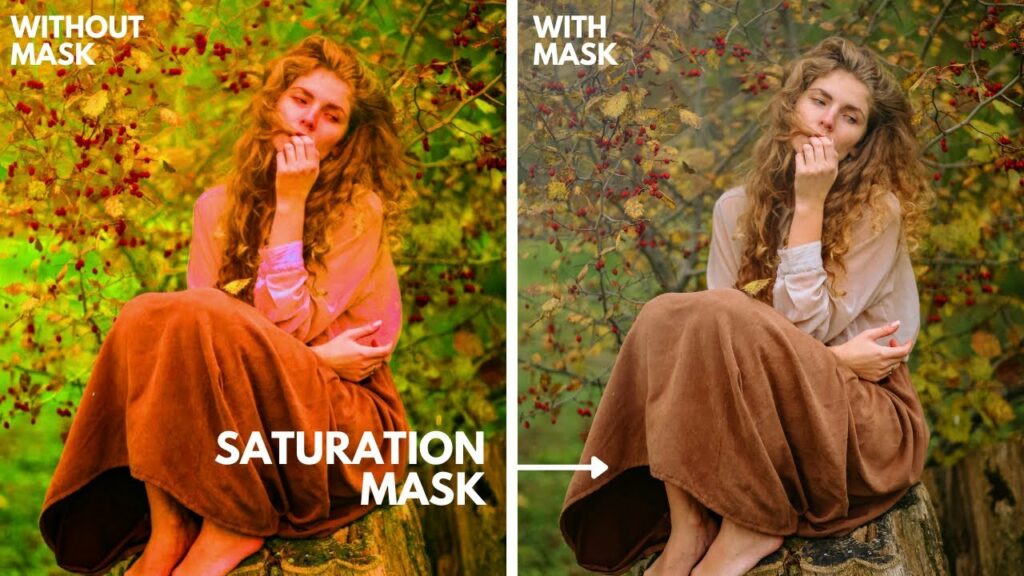
Section 1: Unveiling the Importance of Saturation Masks
1.1 The Role of Saturation in Image Editing
Saturation, the intensity of colors in an image, plays a pivotal role in visual impact. Saturation masks provide a targeted way to manipulate and enhance specific color ranges, offering a nuanced approach to color grading, retouching, and creative adjustments.
1.2 Precision and Versatility
Saturation masks, when crafted with precision, offer unparalleled versatility in image editing. Whether aiming to enhance vibrancy, selectively desaturate, or create artistic effects, saturation masks empower photographers and digital artists to achieve their desired aesthetic.
Section 2: Understanding HSB/HSL Filters
2.1 HSB vs. HSL
Before delving into the filter technique, grasp the distinction between HSB (Hue, Saturation, Brightness) and HSL (Hue, Saturation, Lightness). Both models represent color information in different ways, and understanding their nuances is crucial for effective color manipulation.
2.2 Photoshop’s HSB/HSL Filter
Explore Photoshop’s HSB/HSL filter, a dynamic tool that allows users to isolate and adjust specific color components within an image. This filter forms the cornerstone of creating precise saturation masks, unlocking a world of possibilities for targeted color editing.
Section 3: Crafting Saturation Masks with HSB/HSL Filters
3.1 Selecting the Right Image
Begin by choosing an image with diverse color elements, providing ample opportunities for experimentation. Images with a broad spectrum of colors enable the creation of saturation masks that cater to specific hues.
3.2 Accessing the HSB/HSL Filter
Navigate through Photoshop’s menu to locate and access the HSB/HSL filter. Familiarize yourself with the filter’s interface, which typically includes sliders for adjusting Hue, Saturation, and Brightness (or Lightness).
Section 4: Creating Saturation Masks
4.1 Isolating Specific Hues
Leverage the HSB/HSL filter to isolate specific hues within the image. Adjust the sliders to target the desired color range, effectively creating a mask that highlights or isolates particular colors.
4.2 Refining Saturation Levels
Fine-tune the saturation levels using the filter’s controls. This step allows for precise adjustments, whether you intend to boost the vibrancy of certain colors or desaturate others for a more muted effect.
Section 5: Applying Saturation Masks in Editing
5.1 Adjustment Layers for Saturation
Implement saturation masks as part of your editing workflow by applying adjustment layers. This technique enables non-destructive editing, allowing you to revisit and modify saturation adjustments seamlessly.
5.2 Creative Applications
Explore the creative applications of saturation masks in various editing scenarios. From enhancing the brilliance of landscapes to selectively desaturating backgrounds for portraiture, saturation masks offer a wealth of creative possibilities.
Section 6: Advanced Techniques with Saturation Masks
6.1 Blending Modes for Nuanced Effects
Dive into the world of blending modes to amplify the impact of saturation masks. Experiment with modes like Overlay, Soft Light, or Color for nuanced and artistic effects that go beyond basic color adjustments.
6.2 Saturation Mask Combinations
Combine multiple saturation masks to create complex and layered effects. This advanced technique involves stacking masks for different color ranges, allowing for intricate control over the overall color balance in an image.
Section 7: Preserving Skin Tones
7.1 Skin Tones and Saturation
Maintaining natural-looking skin tones is crucial in many photographic edits. Learn how to use saturation masks to target and preserve skin tones, ensuring that adjustments primarily impact the surrounding colors.
7.2 Color Grading with Precision
Enhance your color grading skills by utilizing saturation masks to isolate specific elements within an image. Whether aiming for a vintage look or a contemporary aesthetic, saturation masks contribute to precise and impactful color grading.
Section 8: Automation and Batch Processing
8.1 Actions for Efficiency
Streamline your workflow by creating Photoshop actions for saturation masks. Automation allows for efficient batch processing, enabling the consistent application of saturation adjustments across multiple images.
8.2 Exploring Batch Processing Options
Delve into Photoshop’s batch processing capabilities to apply saturation masks to entire folders of images. This approach is particularly valuable for photographers or designers working on projects with a consistent color theme.
Section 9: Troubleshooting and Refinement
9.1 Addressing Mask Imperfections
Saturation masks, like any technique, may occasionally present imperfections. Learn how to identify and address issues such as color bleeding or artifacts, ensuring a polished and professional outcome.
9.2 Iterative Refinement
Embrace an iterative approach to refinement. Regularly revisit your saturation masks, especially when working on complex edits, to fine-tune and optimize color adjustments based on evolving creative decisions.
Section 10: Final Touches and Review
10.1 Comprehensive Image Review
Before finalizing your edits, conduct a comprehensive review of the image. Pay attention to overall color balance, saturation levels, and the impact of adjustments on different elements within the composition.
10.2 Seeking Feedback and Iteration
Share your edited images with peers, mentors, or online communities to gather constructive feedback. Iteration based on external perspectives can lead to refinements and improvements in your approach to creating saturation masks.
Section 11: Conclusion – Mastering Saturation Masks with HSB/HSL Filters
In the expansive landscape of digital image editing, mastering saturation masks with HSB/HSL filters in Photoshop emerges as a cornerstone skill. Armed with the insights and techniques from this comprehensive guide, you are poised to wield the power of saturation masks with precision and creativity. As you embark on your editing endeavors, may the nuanced control over color saturation become a defining element in your artistic toolkit, unlocking a world of possibilities for vibrant and impactful visual storytelling.


