Mastering Assembly Creation in SolidWorks: A Comprehensive Guide

Introduction: SolidWorks, a leading computer-aided design (CAD) software, empowers engineers and designers to create complex assemblies consisting of multiple components. Assemblies play a crucial role in product design, allowing users to visualize, simulate, and analyze the interactions between individual parts within a larger system. In this comprehensive guide, we’ll explore the intricacies of creating assemblies in SolidWorks, covering fundamental concepts, essential techniques, and advanced strategies to help you master this versatile tool.
Understanding Assemblies in SolidWorks: An assembly in SolidWorks is a collection of parts and subassemblies that are brought together to form a complete product or system. Each component within the assembly retains its individual properties, dimensions, and relationships, allowing for precise modeling and analysis. Before delving into the specifics of creating assemblies, it’s crucial to grasp some foundational concepts:
- Part Modeling:
- Part modeling forms the basis of assembly creation in SolidWorks, allowing users to design individual components with complex geometries and features. Parts are created using sketching, extrusions, revolves, sweeps, and other modeling techniques.
- Mate Relationships:
- Mate relationships define the spatial orientation and alignment of components within an assembly. SolidWorks provides a variety of mate types, including coincident, parallel, perpendicular, concentric, and tangent, to constrain parts relative to each other accurately.
- Subassemblies:
- Subassemblies are assemblies that contain other assemblies or components. Subassemblies are used to organize and modularize complex designs, making it easier to manage and manipulate large assemblies with multiple levels of hierarchy.
Creating Assemblies in SolidWorks: SolidWorks offers a straightforward method for creating assemblies, allowing users to assemble components and define mate relationships with ease. Let’s explore the essential steps for creating assemblies:
- Start a New Assembly:
- Begin by starting a new assembly document in SolidWorks. You can access the New Document dialog from the File menu or the Welcome screen. Choose the assembly template that best suits your design requirements, such as metric or inch-based, and click OK to open the assembly environment.
- Insert Components:
- Once the assembly document is open, insert components into the assembly by using the Insert Component command. You can insert parts, subassemblies, or even other assemblies from existing SolidWorks files or by creating new components within the assembly environment.
- Define Mate Relationships:
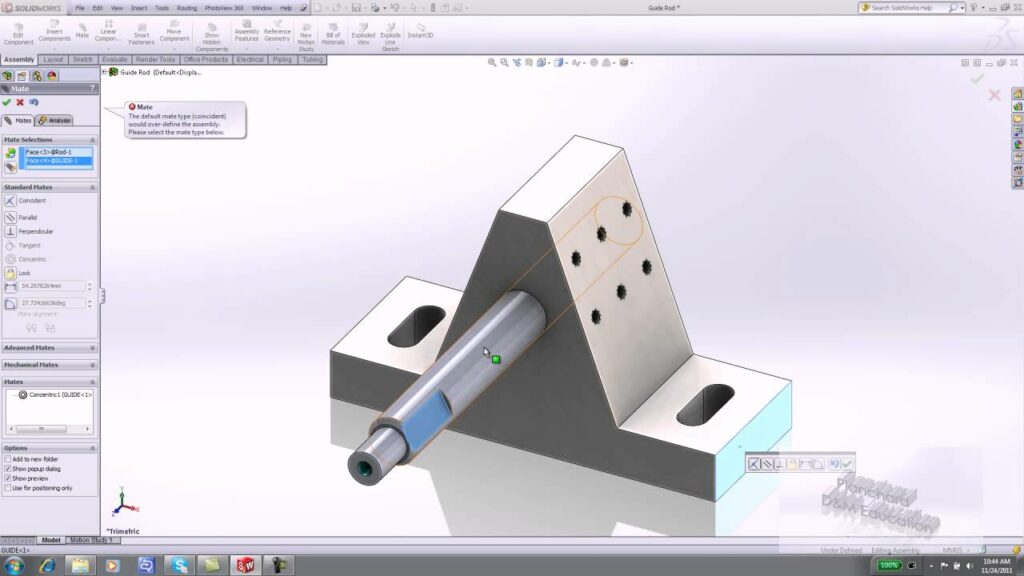
- After inserting components, define mate relationships to constrain their position and orientation relative to each other. Use the Mate command from the Assembly tab or the right-click context menu to select mate types and specify mate references on component faces, edges, or vertices.
- Repeat and Validate:
- Continue inserting components and defining mate relationships until the assembly is complete. Regularly validate the assembly by rotating, moving, and testing component interactions to ensure that mate relationships are accurate and components are properly aligned.
Advanced Assembly Techniques: In addition to basic assembly tools, SolidWorks offers advanced techniques to enhance assembly creation workflows and achieve precise design objectives:
- Smart Components:
- SolidWorks allows users to create smart components that contain predefined mate relationships and configurations. Smart components streamline the assembly process by automatically mating to other components and adjusting configurations based on user input.
- Top-Down Design:
- Top-down design is a methodology in SolidWorks that allows users to create assemblies by defining components and relationships within the context of the assembly environment. This approach enables simultaneous design of parts and assemblies, improving design flexibility and efficiency.
- Assembly Features:
- SolidWorks provides assembly-level features such as cuts, holes, and patterns that can be applied directly to components within the assembly. Assembly features allow users to modify multiple components simultaneously and create complex geometry without altering individual part files.
Best Practices for Assembly Creation: To maximize efficiency and maintain design integrity when creating assemblies in SolidWorks, it’s essential to adhere to best practices:
- Organize Components:
- Organize components within the assembly hierarchy using folders, subassemblies, and naming conventions. Keep related components together and use descriptive names to facilitate navigation and management of the assembly.
- Use Standard Hardware:
- Use standard hardware components such as bolts, nuts, washers, and screws from SolidWorks’ built-in library or third-party catalogs. Standardizing hardware reduces design time, ensures compatibility, and simplifies procurement and assembly processes.
- Document Assembly Structure:
- Document the assembly structure, mate relationships, and design intent using annotations, configurations, and exploded views. Create assembly drawings, bill of materials (BOMs), and assembly instructions to communicate design specifications effectively.
- Collaborate and Review:
- Collaborate with team members, stakeholders, and suppliers to review and validate the assembly design. Use tools like eDrawings, 3D PDFs, and SolidWorks PDM to share and collaborate on assembly files securely.
Conclusion: Assembly creation is a fundamental aspect of product design in SolidWorks, enabling engineers and designers to bring together individual components to form complete systems. By mastering the tools and techniques for creating assemblies, you can enhance your design capabilities, streamline your workflow, and produce high-quality models that meet design requirements and manufacturing standards. Whether you’re a novice or an experienced SolidWorks user, understanding the principles of assembly creation and applying best practices will elevate your design proficiency and enable you to realize your design visions with precision and efficiency.


