How to change screen resolution
Introduction to Changing Screen Resolution
Screen resolution refers to the number of pixels displayed horizontally and vertically on your monitor or screen. Changing the screen resolution allows you to adjust the amount of content displayed and the clarity of images and text. Higher resolutions provide sharper images and more detailed content, while lower resolutions can make items appear larger on the screen. This guide covers how to change screen resolution in Windows 10, macOS, and Ubuntu Linux, providing step-by-step instructions for each operating system.
Windows 10
Step-by-Step Guide to Change Screen Resolution in Windows 10
Step 1: Access Display Settings
- Open Settings:
- Right-click on the Start button and select “Settings” from the context menu. Alternatively, press
Win + Ito open Settings directly.
- Right-click on the Start button and select “Settings” from the context menu. Alternatively, press
- Go to System Settings:
- In the Settings window, click on “System.”
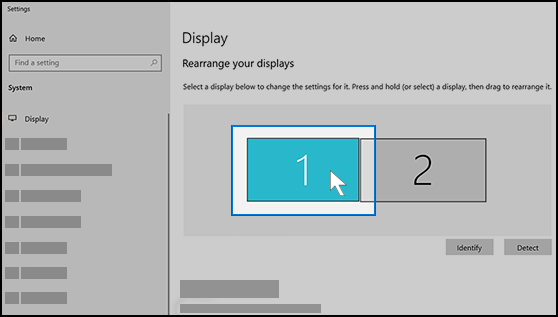
- Access Display Settings:
- In the left-hand menu of the System settings, click on “Display.” This opens the Display settings where you can adjust resolution and other display settings.
Step 2: Change Screen Resolution
- Select Resolution:
- Under the “Scale and layout” section, scroll down to the “Display resolution” section.
- Choose a Resolution:
- Use the dropdown menu under “Resolution” to select the desired resolution. Windows 10 will display available resolutions based on your monitor or screen capabilities.
- Apply Changes:
- After selecting a resolution, Windows will preview the change. Click on “Apply” to apply the new resolution. Your screen will temporarily change to the new resolution for you to review.
- Confirm Changes:
- If you are satisfied with the new resolution, click “Keep changes” to apply it permanently. If not, click “Revert” to return to the previous resolution.
macOS
Step-by-Step Guide to Change Screen Resolution in macOS
Step 1: Open System Preferences
- Click on the Apple Menu:
- Click on the Apple logo in the top-left corner of the screen to open the Apple menu.
- Select “System Preferences”:
- From the Apple menu, select “System Preferences.” This opens the System Preferences window.
Step 2: Access Display Settings
- Open Display Preferences:
- In the System Preferences window, click on “Displays.” This opens the Display settings where you can adjust resolution and other display settings.
Step 3: Change Screen Resolution
- Select Resolution:
- In the Display settings, click on the “Display” tab if it’s not already selected.
- Choose Scaled Resolution:
- You’ll see a list of scaled resolution options. Click on one to select it. macOS will apply the new resolution immediately.
- Adjust Resolution Manually (Optional):
- If you want to set a custom resolution, hold down the Option key and click on the “Scaled” option. This reveals additional resolution options, including default and custom resolutions.
- Apply Changes:
- After selecting a resolution, macOS will apply the change immediately. Close the System Preferences window once you’ve chosen the desired resolution.
Ubuntu Linux
Step-by-Step Guide to Change Screen Resolution in Ubuntu Linux
Step 1: Access Display Settings
- Open Settings:
- Click on the “Activities” button in the top-left corner of the screen (or press the Windows key), and type “Settings.” Open the “Settings” application.
- Navigate to Display Settings:
- In the “Settings” application, click on “Devices” and then select “Displays.” This opens the Display settings where you can adjust resolution and other display settings.
Step 2: Change Screen Resolution
- Select Resolution:
- In the Display settings, you’ll see a list of available resolutions under the “Resolution” dropdown menu. Click on the resolution you want to use.
- Apply Changes:
- Ubuntu Linux will apply the new resolution immediately. If you’re satisfied with the new resolution, close the Settings window.
Conclusion
Changing the screen resolution allows you to adjust the clarity and size of text and images displayed on your monitor or screen. Whether you’re using Windows 10, macOS, or Ubuntu Linux, the process involves accessing display settings specific to each operating system and selecting a desired resolution from available options. By following the step-by-step guides provided in this article, you can easily change the screen resolution to optimize your viewing experience according to your preferences and monitor capabilities.
Experiment with different resolutions to find the one that best suits your needs for clarity, readability, and visual quality.


