Mastering White Balance: A Comprehensive Guide to Using a Gray Card with Lightroom
Achieving accurate and pleasing white balance is a crucial aspect of photography, influencing the overall mood and tone of your images. While modern cameras offer sophisticated auto-white balance settings, there are situations where manual control becomes indispensable. In this comprehensive guide, we explore the art and science of white balance, focusing on the powerful synergy between a gray card and Adobe Lightroom to elevate your photography to new levels of color accuracy and visual harmony.
Section 1: Understanding White Balance
1.1 The Importance of White Balance
White balance is the process of adjusting the colors in a photograph to accurately represent how the scene appears in real life. It ensures that whites appear truly white, regardless of the lighting conditions under which the photo was taken.
1.2 Challenges of Auto White Balance
While auto white balance (AWB) in cameras is sophisticated, it may struggle in mixed lighting situations or scenes with dominant color casts. This is where manual control, aided by a gray card, becomes invaluable.
Section 2: The Role of a Gray Card
2.1 What is a Gray Card?
A gray card is a simple yet powerful tool used by photographers to provide a neutral reference point for setting accurate white balance. It typically features a surface that reflects exactly 18% of light, appearing mid-gray to the human eye.
2.2 How a Gray Card Works
The concept is straightforward – by photographing a gray card under the same lighting conditions as your subject, you create a reference point for accurate color correction. This reference image helps Lightroom understand the true neutral tones in your scene.
Section 3: Using a Gray Card in the Field
3.1 When to Use a Gray Card
A gray card is particularly beneficial in situations where lighting conditions are challenging, such as indoor environments with mixed artificial lighting, or during the golden hours when natural light undergoes significant color temperature changes.
3.2 How to Use a Gray Card
Using a gray card involves capturing an image of it under the same lighting conditions as your subject. Ensure the gray card is evenly illuminated, fill the frame with the card, and take a reference photo before proceeding with your actual shots.
Section 4: Capturing Reference Images
4.1 Setting up Your Shots
Before diving into your main photography session, take a series of reference shots with the gray card. These reference images will serve as the baseline for accurate color correction in Lightroom.
4.2 Including the Gray Card in Composition
While the primary purpose of the gray card is color correction, it can also be included in your compositions creatively. Experiment with incorporating the gray card as an element in your scenes to add depth or visual interest.
Section 5: Importing Images into Lightroom
5.1 Organizing Your Workflow
As you import your images into Lightroom, create a dedicated folder or collection for the shots featuring the gray card. This organization ensures a streamlined and efficient workflow during the post-processing phase.
5.2 Initial Lightroom Settings
Begin by adjusting basic settings such as exposure and contrast for your reference images. These adjustments serve as a starting point for your subsequent color correction efforts.
Section 6: White Balance Adjustment in Lightroom
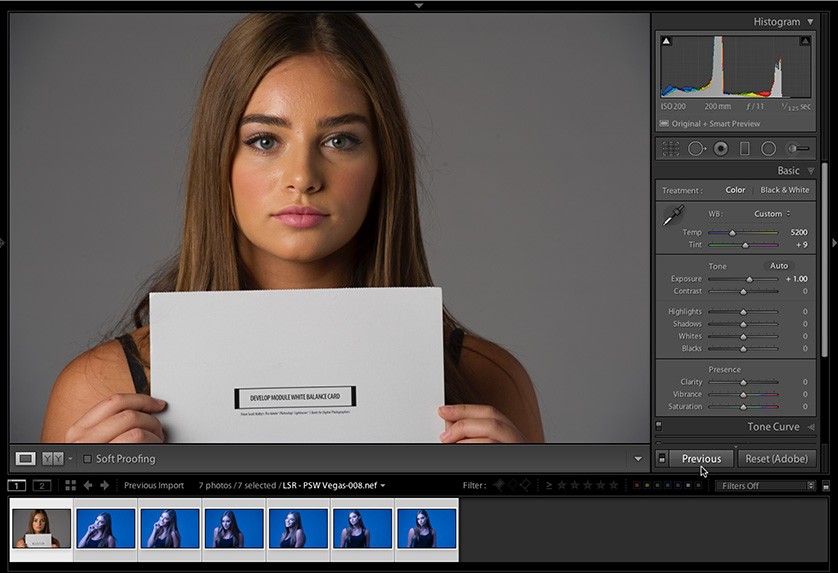
6.1 Develop Module Navigation
Enter the Develop module in Lightroom to access the suite of tools for image enhancement. Locate the White Balance section, where precise adjustments can be made to achieve accurate color representation.
6.2 Using the Reference Image
Select the reference image featuring the gray card and use the eyedropper tool in the White Balance section to click on the mid-gray portion of the card. Lightroom will automatically adjust the white balance based on this neutral reference.
Section 7: Fine-Tuning White Balance
7.1 Temperature and Tint Adjustments
While the initial adjustment with the gray card sets a solid foundation, fine-tune the white balance further by manually adjusting the temperature and tint sliders. Pay attention to subtle changes in color cast and strive for a visually pleasing result.
7.2 Targeted Adjustment Tool
Explore the Targeted Adjustment Tool in Lightroom, allowing you to click and drag directly on areas of your image to adjust color temperature and tint. This precise tool enhances control over localized color corrections.
Section 8: Syncing Adjustments Across Images
8.1 Batch Processing for Efficiency
If you’ve captured a series of images under the same lighting conditions, leverage Lightroom’s batch processing capabilities. Apply the white balance adjustments made to the reference image across the entire series for consistency.
8.2 Manual Tweaks for Individual Shots
While batch processing is efficient, be mindful of individual variations in lighting that may require manual adjustments. Review each image in your series, making subtle tweaks to ensure optimal color accuracy.
Section 9: Utilizing Lightroom Presets
9.1 Creating White Balance Presets
For recurring scenarios with similar lighting conditions, consider creating custom white balance presets in Lightroom. This streamlines your workflow, allowing you to apply consistent color corrections with a single click.
9.2 Incorporating Gray Card in Preset Workflow
Integrate the use of a gray card into your preset workflow. Develop presets that include the white balance adjustments based on your gray card reference images, providing a quick and reliable starting point for future editing.
Section 10: Troubleshooting Common Issues
10.1 Addressing Mixed Lighting
In scenes with multiple light sources of varying color temperatures, use the gray card to prioritize color correction for the dominant lighting. Manually address minor variations to maintain a cohesive look.
10.2 Handling Complex Lighting Scenarios
For complex lighting scenarios, where the gray card may not fully neutralize color casts, embrace the iterative process of trial and error. Experiment with different adjustments until achieving a visually satisfying result.
Section 11: Iterative Review and Feedback
11.1 Iterative Approach to Perfection
Adopt an iterative approach to reviewing and refining your white balance adjustments. Take breaks during your editing sessions and return with fresh eyes to ensure that the colors are balanced and harmonious.
11.2 Seeking Feedback for Precision
Share your edited images, particularly those corrected using the gray card method, with peers or mentors. External feedback can provide valuable insights, aiding in the refinement of your white balance skills.
Section 12: Final Touches and Exporting
12.1 Comprehensive Image Review
Before exporting your final images, conduct a comprehensive review. Zoom in to inspect details, assess color accuracy, and ensure that the gray card-assisted white balance adjustments have been seamlessly integrated.
12.2 Export Settings for Quality
Configure Lightroom’s export settings to preserve the quality of your meticulously edited images. Pay attention to resolution, file format, and color space to ensure optimal presentation across different platforms.
Section 13: Conclusion – Mastering White Balance with a Gray Card and Lightroom
In the dynamic and visually rich world of photography, mastering white balance stands as a fundamental skill. The marriage of a gray card and Lightroom unlocks a precise and efficient method for achieving accurate color representation in your images. As you embark on your journey of visual storytelling, may the neutral tones of the gray card be your guiding light, leading you to a realm where colors resonate truthfully and harmoniously, capturing the essence of every moment through the lens of your creative vision.


