Mastering Color Harmony: A Comprehensive Guide on Color Matching in Photoshop – Changing the Color of Stock Images to Pantone Color of the Year
James February 26, 2024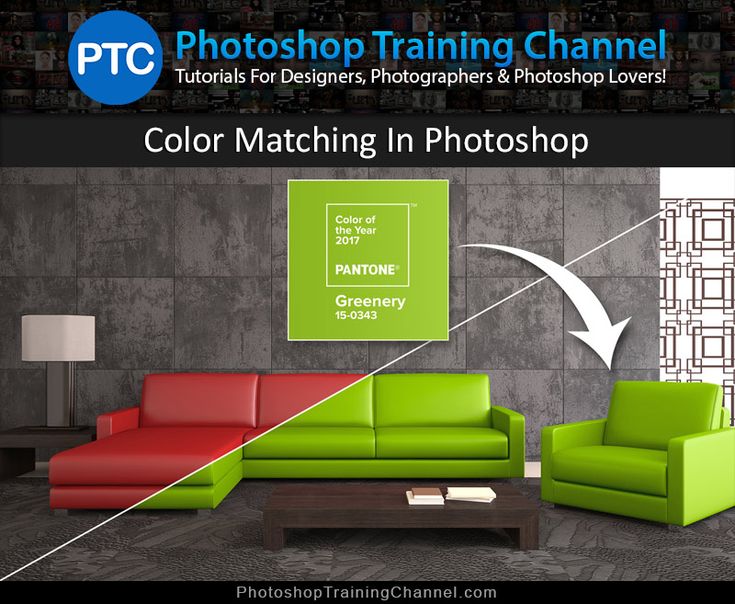
Introduction: Color plays a pivotal role in visual communication and design, and Pantone Color of the Year stands as a trendsetting palette that influences various creative industries. In this extensive tutorial, we will embark on a journey of color matching in Adobe Photoshop, focusing on changing the color of stock images to the Pantone Color of the Year. This comprehensive guide will provide step-by-step instructions, creative insights, and advanced techniques to help you master the art of color matching with precision and creativity.
Section 1: Understanding Pantone Color of the Year Before diving into the practical steps, it’s essential to grasp the significance of Pantone Color of the Year. Explore the history, influence, and cultural context behind this annual color selection. This section will discuss how Pantone’s color choice reflects current trends, evokes emotions, and sets the tone for creative expression.
Section 2: Selecting the Pantone Color of the Year Discover the Pantone Color of the Year for your chosen timeframe. Whether it’s Classic Blue, Living Coral, or any other vibrant hue, understanding the chosen color is the foundation for successful color matching. This section will guide you through accessing and confirming the Pantone Color of the Year.
Section 3: Choosing Stock Images for Color Transformation Carefully select stock images that align with your creative vision and are conducive to color transformation. Consider factors such as composition, lighting, and the intended mood of your final design. This section will provide insights into choosing the right images for a seamless color transformation process.
Section 4: Setting Up Your Photoshop Workspace Open Adobe Photoshop and create a new project, setting up the canvas size, resolution, and color mode. Establishing the right workspace is crucial for an efficient and organized color matching workflow. This section will guide you through the initial steps of preparing your workspace for color transformation.
Section 5: Understanding Color Spaces and Pantone Swatches Delve into the fundamentals of color spaces and Pantone swatches. Understand how color spaces like RGB and CMYK function in digital design, and explore Pantone swatches to familiarize yourself with the color codes associated with the chosen Pantone Color of the Year. This section will provide insights into navigating color spaces and Pantone libraries in Photoshop.
Section 6: Opening and Preparing Stock Images Import your chosen stock images into Photoshop and prepare them for color transformation. This involves assessing image resolution, adjusting composition if necessary, and ensuring a clean and organized layer structure. This section will guide you through the initial steps of preparing stock images for color matching.
Section 7: Using Adjustment Layers for Color Transformation Adjustment layers are powerful tools for color transformation in Photoshop. Learn how to utilize adjustment layers such as Hue/Saturation, Color Balance, and Selective Color to change the overall color tones of your stock images. This section will provide step-by-step instructions on applying adjustment layers for precise color matching.
Section 8: Matching Pantone Color Values To achieve accurate Pantone Color of the Year representation, match the Pantone color values in Photoshop. Explore techniques for inputting Pantone color codes and adjusting color sliders to align with the chosen hue. This section will guide you through the process of achieving a perfect match to the Pantone Color of the Year.
Section 9: Applying Gradient Maps for Seamless Transitions Gradient Maps offer a refined approach to color transformation, providing smooth transitions and tonal variations. Learn how to apply Gradient Maps to your stock images, enhancing the overall color harmony and achieving a polished look. This section will guide you through the creative use of Gradient Maps for seamless color transitions.
Section 10: Customizing Color Grading for Aesthetic Appeal Elevate your color-matched images by customizing color grading. Explore advanced color grading techniques using adjustment layers, blending modes, and filters to enhance the aesthetic appeal of your designs. This section will provide insights into creative color grading for a visually compelling result.
Section 11: Incorporating Shadows and Highlights Adding shadows and highlights is crucial for achieving realism and depth in color-matched images. Explore techniques for incorporating shadows and highlights using brushes, layer styles, and adjustment layers. This section will guide you through the process of enhancing the three-dimensional aspects of your color-matched designs.
Section 12: Fine-Tuning and Iterative Adjustments Achieving perfection in color matching involves fine-tuning and iterative adjustments. Explore techniques for refining color tones, addressing inconsistencies, and iteratively adjusting layers for optimal results. This section will guide you through the meticulous process of refining your color-matched images until they reach a professional standard.
Section 13: Saving and Exporting Color-Matched Designs With your color-matched designs perfected, it’s time to save and export your digital masterpieces. Uncover the optimal file formats, resolutions, and color profiles to ensure your images are ready for sharing across various platforms and applications. This section will provide a seamless transition from creative exploration to a polished final product.
Section 14: Applying Color-Matched Designs to Various Media Explore the versatility of your color-matched designs by applying them to various media. Whether it’s digital graphics, print materials, or web designs, adapt your color-matched images to suit different contexts. This section will guide you through the process of incorporating your designs into diverse creative projects.
Section 15: Showcasing Pantone-Inspired Design Projects Immerse yourself in inspiration by exploring Pantone-inspired design projects. Discover how designers across various industries leverage the Pantone Color of the Year in their creations. This section will provide a visual showcase of the creative possibilities and diverse applications of Pantone-inspired designs.
Section 16: Exploring Advanced Techniques for Color Transformation For those seeking to push the boundaries of color transformation, explore advanced techniques. Learn about channel mixing, gradient meshes, and advanced blending modes to achieve intricate and sophisticated color effects. This section will provide insights into mastering advanced techniques for professional and artistic excellence.
Section 17: Troubleshooting Common Color Matching Challenges Encounter and overcome common challenges associated with color matching in Photoshop. Explore troubleshooting techniques for issues such as color discrepancies, unexpected artifacts, or undesired color shifts. This section will guide you through optimizing your color matching workflow for smooth and efficient results.
Conclusion: Color matching in Photoshop, especially when transforming stock images to the Pantone Color of the Year, is a testament to the intersection of technology and design. This comprehensive guide has equipped you with the knowledge, techniques, and creative insights needed to navigate the intricate process of color matching. Embrace the annual Pantone Color of the Year as a source of inspiration, elevate your digital artistry, and embark on a journey of vibrant creativity within the versatile realm of Adobe Photoshop. As you experiment with color matching, let your designs become a testament to the timeless influence and expressive power of color in the ever-evolving world of design trends.


