Mastering Boundaries: An Extensive Guide to Creating Boundaries around Selected Objects in CorelDRAW

Introduction:
CorelDRAW, a powerhouse in the world of graphic design, empowers users with a diverse array of tools for bringing creative visions to life. Among these tools, the ability to create boundaries around selected objects stands out as a fundamental skill that adds precision and definition to design compositions. This comprehensive guide aims to explore the intricacies of creating boundaries around selected objects in CorelDRAW, providing valuable insights for both beginners and experienced designers seeking to refine their skills.
I. Understanding the Significance of Object Boundaries:
- Defining Object Boundaries: Object boundaries serve as delineations or outlines around selected elements, adding emphasis, clarity, and structure to a design. These boundaries contribute to visual hierarchy and aid in the separation of distinct elements within a composition.
- Enhancing Visual Appeal: Creating boundaries around selected objects enhances the visual appeal of a design by providing a clear definition between different elements. This technique is particularly valuable for emphasizing specific areas, creating focal points, or achieving a cohesive look.
II. Basic Techniques for Creating Object Boundaries:
- Selecting Objects: Initiate the process by selecting the objects around which you wish to create boundaries. Use the Pick tool to click on individual objects while holding down the Shift key to select multiple elements. Ensure that the chosen objects collectively form the composition you want to highlight.
- Accessing the Boundary Creation Tool: Navigate to the Object menu or use the right-click context menu to find the appropriate boundary creation tool. Depending on the CorelDRAW version, this tool may be labeled as “Create Boundary” or similar. Alternatively, look for an icon or button associated with boundary creation.
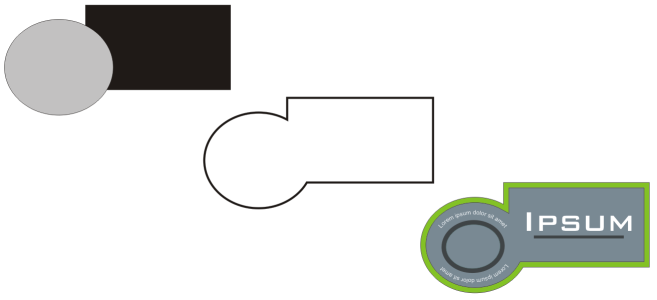
- Creating Boundaries: After accessing the boundary creation tool, click within the selected objects or drag to define the area you want the boundary to enclose. CorelDRAW interprets the selected space and generates a boundary around the chosen objects.
III. Utilizing Boundary Styles and Attributes:
- Choosing Boundary Styles: CorelDRAW provides various styles for object boundaries, such as solid lines, dashes, or custom patterns. Access the Object Properties docker or the formatting toolbar to select the desired boundary style.
- Adjusting Boundary Thickness: Fine-tune the appearance of boundaries by adjusting their thickness. This can be done through the Object Properties docker or the formatting toolbar, allowing designers to tailor the visual impact of the boundaries.
IV. Navigating the Object Manager for Boundaries:
- Organizing Boundaries: The Object Manager is a valuable tool for managing design elements, including boundaries. It allows designers to organize, rename, and control the visibility of boundaries, especially in complex projects with multiple objects.
- Grouping with Boundaries: Consider grouping objects along with their boundaries for efficient management. Grouping ensures that the objects and their corresponding boundaries stay together during editing, simplifying the design process.
V. Advanced Techniques for Boundary Creation:
- Creating Custom Boundary Shapes: CorelDRAW enables designers to create custom boundary shapes. Use the Shape tool or shaping operations to modify the boundaries, providing a tailored and creative touch to the design.
- Boundary Effects with PowerClip: PowerClip offers dynamic possibilities for boundary effects. Place objects within PowerClip containers and apply boundary transformations for intricate and visually appealing design compositions.
VI. Troubleshooting and Best Practices:
- Checking for Gaps: When creating boundaries, be attentive to potential gaps or overlaps between selected objects. These discrepancies may impact the accuracy of the boundary creation. Adjust objects as needed to ensure a seamless boundary.
- Undo/Redo Functionality: The Undo (Ctrl + Z) and Redo (Ctrl + Y) commands provide a safety net for reversing actions. If the boundary creation is undesired or if you wish to experiment with different variations, use these commands to navigate through the editing history.
VII. Collaboration and Boundary Creation:
- Sharing Design Elements: Collaborators can benefit from shared design elements, including boundaries. Ensure that collaborators have access to the same design assets or provide them with exported objects for seamless collaboration.
- Version Compatibility: When sharing designs, be mindful of version compatibility. Certain boundary attributes or effects may vary between different versions of CorelDRAW.
VIII. Documenting Boundary Creation Processes:
- Creating Tutorials and Guides: For educational or collaborative purposes, document the process of creating boundaries around selected objects. Create tutorials, design process documents, or annotations within the design file to guide team members or for future reference.
- Maintaining Design Consistency: When creating boundaries, ensure design consistency by aligning styles, thickness, and formatting with the overall design aesthetics. This practice contributes to a cohesive visual experience.
Conclusion:
In conclusion, the ability to create boundaries around selected objects in CorelDRAW is a fundamental skill that adds definition and visual appeal to design compositions. As designers navigate through the step-by-step guide and explore advanced techniques, they gain a deeper understanding of the tools available for enhancing their creations. By incorporating troubleshooting tips, best practices, and collaborative strategies, designers can confidently wield the power of boundary creation in CorelDRAW, ensuring a polished and impactful design workflow. Embrace the versatility and creativity that boundaries offer, and let your designs flourish with precision and visual distinction.


