How to use the video pre-cut tool in PowerDirector
Using the video pre-cut tool in CyberLink PowerDirector enhances your video editing workflow by allowing you to efficiently trim and select segments from your raw footage before importing them into your project timeline. This tool is particularly useful for organizing and refining large video files, enabling precise editing and faster content selection. Understanding how to use the video pre-cut tool effectively can significantly streamline your editing process and improve overall productivity. This comprehensive guide will walk you through everything you need to know about using the video pre-cut tool in PowerDirector, from accessing and applying it to your workflow to advanced techniques and troubleshooting tips.
1. Introduction to the Video Pre-Cut Tool in PowerDirector
The video pre-cut tool in PowerDirector facilitates the process of selecting specific segments or clips from longer video files before importing them into your main editing timeline. This tool allows you to preview and trim footage, ensuring only the desired portions are included in your project, thereby saving time and optimizing workflow efficiency.
a. Benefits of Using the Video Pre-Cut Tool
- Efficiency: Quickly browse through and trim large video files to isolate relevant segments for editing.
- Precision: Achieve precise cuts and selections without affecting the original source files.
- Organization: Organize and categorize footage into manageable segments before incorporating them into your main editing timeline.
b. Applications of the Video Pre-Cut Tool
- Footage Selection: Choose specific scenes, takes, or moments from recorded footage for inclusion in your project.
- Storyboarding: Arrange and sequence pre-cut clips to plan the structure and flow of your video project effectively.
- Media Management: Manage and organize video assets by segmenting them into smaller, more manageable files for streamlined editing.
2. Accessing the Video Pre-Cut Tool in PowerDirector
PowerDirector integrates the video pre-cut tool into its interface, providing intuitive access and controls for efficient video trimming and selection.
a. Interface Navigation
- Media Room: Access the video pre-cut tool within the Media Room or Library interface, where video files are imported and organized.
- Timeline Integration: Integrate pre-cut segments seamlessly into your main editing timeline for further refinement and creative editing.
b. Tool Activation
- Selection Process: Choose video files or clips to apply the pre-cut tool, initiating the process of previewing and trimming segments for editing.
- Preview Options: Use playback controls to preview footage within the pre-cut tool interface, ensuring accurate selection and trimming.
3. Using the Video Pre-Cut Tool in PowerDirector
Mastering the video pre-cut tool in PowerDirector involves understanding its functionalities and applying them to your video editing projects effectively.
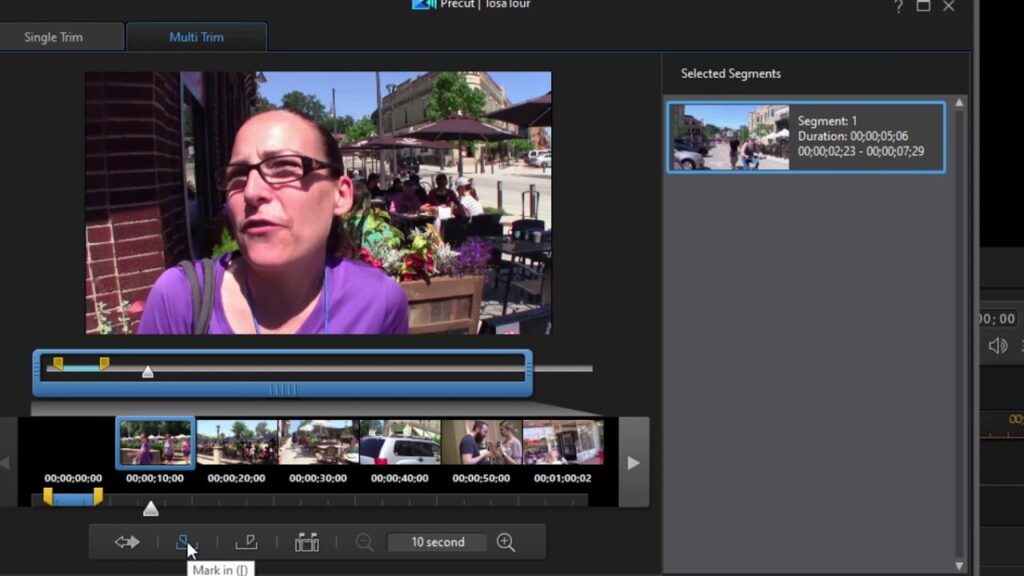
a. Clip Selection and Trimming
- Marking In and Out Points: Set precise in and out points to define the beginning and end of desired segments within the video footage.
- Trimming Controls: Use trimming controls within the pre-cut tool interface to adjust and refine selected segments, ensuring optimal content selection.
b. Preview and Playback
- Playback Options: Preview selected segments or clips within the pre-cut tool interface to verify content accuracy and quality before importing into the main editing timeline.
- Frame Navigation: Navigate frame by frame within the pre-cut tool for detailed examination and fine-tuning of selected footage segments.
4. Advanced Techniques with the Video Pre-Cut Tool
Explore advanced techniques and features within the video pre-cut tool in PowerDirector to further enhance your editing capabilities and workflow efficiency.
a. Multi-Clip Selection
- Batch Processing: Select and pre-cut multiple video clips simultaneously to streamline the organization and segmentation of video assets for complex editing projects.
- Grouping and Sequencing: Arrange pre-cut segments into groups or sequences within the pre-cut tool interface to facilitate storyboard planning and visual storytelling.
b. Customization Options
- Segment Management: Manage and categorize pre-cut segments using customizable labels, tags, or metadata within PowerDirector’s organizational tools.
- Export and Sharing: Export pre-cut segments as individual files or clips for sharing, collaboration, or archival purposes outside of the main editing project.
5. Tips and Best Practices for Using the Video Pre-Cut Tool
Maximize the effectiveness of the video pre-cut tool in PowerDirector with these tips and best practices for efficient video trimming and selection.
a. Organizational Planning
- Storyboard Development: Plan and outline your video project structure using pre-cut segments to visualize the narrative flow and content sequencing.
- Asset Management: Organize and label pre-cut segments systematically to maintain clarity and accessibility throughout the editing process.
b. Workflow Optimization
- Preview and Review: Use preview options extensively within the pre-cut tool to ensure selected segments align with project objectives and creative vision.
- Collaborative Editing: Collaborate with team members or clients by sharing pre-cut segments for feedback and input before finalizing editing decisions.
6. Troubleshooting Common Issues
Address common challenges encountered when using the video pre-cut tool in PowerDirector to optimize workflow efficiency and achieve desired editing outcomes.
a. Performance Optimization
- Hardware Acceleration: Enable hardware acceleration settings within PowerDirector to enhance playback performance and responsiveness when previewing or trimming video segments.
- Storage Management: Maintain adequate storage space and optimize file management practices to accommodate large video files and pre-cut segments without compromising system performance.
b. Quality Control and Assurance
- Playback Verification: Conduct thorough playback testing of pre-cut segments within PowerDirector to verify audio-visual synchronization, content integrity, and quality consistency.
- Export Settings: Configure export settings appropriately to preserve video quality and ensure seamless integration of pre-cut segments with other project elements during final rendering and production.
7. Exporting Projects with Pre-Cut Segments
Once you’ve selected and trimmed video segments using the pre-cut tool in PowerDirector, it’s essential to integrate them seamlessly into your main editing timeline and export your final video project.
a. Final Integration
- Timeline Integration: Drag and drop pre-cut segments from the pre-cut tool interface into your main editing timeline within PowerDirector for further refinement and creative enhancement.
- Seamless Transitions: Ensure smooth transitions between pre-cut segments and other video elements to maintain narrative coherence and visual continuity throughout the edited project.
b. Export Settings
- Format Selection: Choose export formats that support high-quality video output and compatibility with various playback platforms and devices.
- Rendering Optimization: Optimize rendering settings to balance file size and video resolution, ensuring optimal playback performance and visual fidelity of the final exported video project.
Conclusion
Utilizing the video pre-cut tool in CyberLink PowerDirector enhances your video editing capabilities by enabling efficient selection and trimming of footage segments before incorporating them into your main editing timeline. By following this comprehensive guide, you’ll gain the skills and knowledge to leverage PowerDirector’s video pre-cut tool effectively, whether you’re editing for personal use, professional productions, or collaborative projects. Experiment with different trimming techniques, explore advanced features, and apply best practices to streamline your video editing workflow and achieve polished results with ease. Happy editing!


