How to speed up or slow down a video clip in PowerDirector
Speeding up or slowing down video clips in PowerDirector allows you to manipulate the pace and timing of your footage, creating dynamic effects, emphasizing moments, or fitting content to specific time constraints. PowerDirector, developed by CyberLink, provides versatile tools for adjusting video speed, enabling you to enhance storytelling, create visual impact, and customize the tempo of your videos with ease. This comprehensive guide will walk you through everything you need to know about speeding up or slowing down a video clip in PowerDirector, covering basic techniques, advanced settings, creative applications, troubleshooting tips, and more.
Understanding Speed Adjustment in Video Editing
Speed adjustment in video editing involves changing the playback rate of a video clip, altering its temporal duration without affecting its visual or audio content quality. Key aspects of speed adjustment include:
- Speed Variations: Increasing (speeding up) or decreasing (slowing down) the playback rate.
- Time Stretching: Maintaining audio pitch while adjusting video speed.
- Frame Rate Control: Preserving smooth motion and visual clarity at different playback speeds.
Effective use of speed adjustment enhances narrative flow, emphasizes action sequences, and aligns video content with creative intentions.
Getting Started with Speed Adjustment in PowerDirector
Importing Media
- Open PowerDirector: Launch PowerDirector and create a new project or open an existing one.
- Import Media Files: Import your video clips into the Media Room by clicking on “Import Media Files” and selecting your video files.
Adding Footage to Timeline
- Drag Video Clip: Drag your video clip from the Media Room to the timeline.
Understanding Speed Adjustment Controls
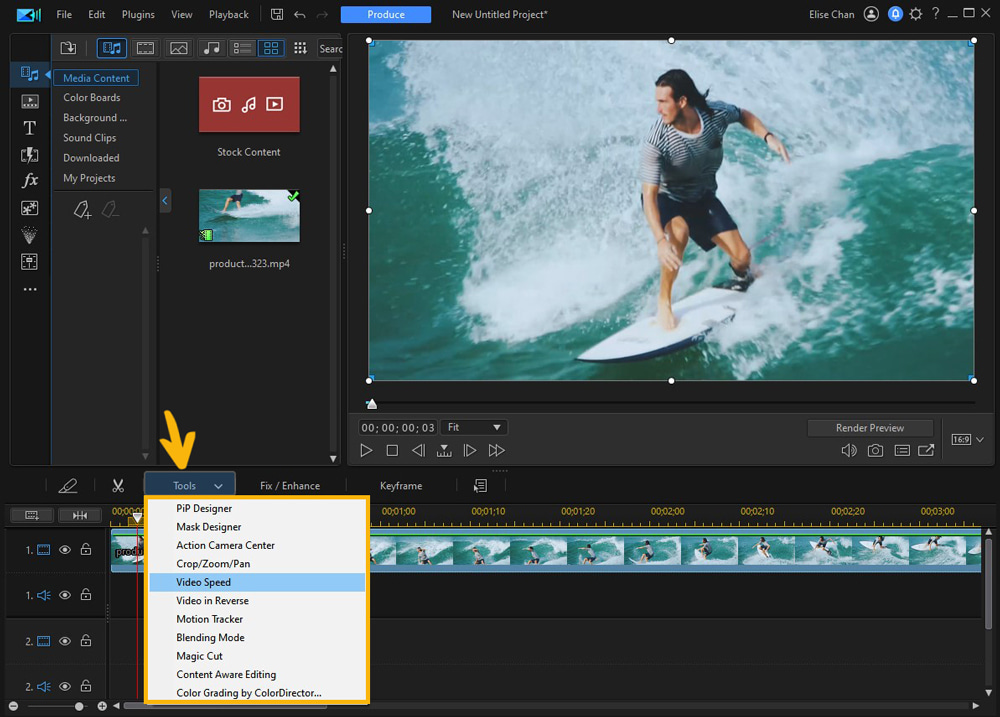
- Speed Tools: Click on the video clip in the timeline to select it.
- Adjust Speed: Right-click on the video clip and select “Speed Adjustment” to access speed controls.
Basic Speed Adjustment Techniques
Speeding Up a Video Clip
- Increase Speed: Enter a higher percentage value (e.g., 150%) to speed up the playback rate of the video clip.
- Apply Speed Adjustment: Click “OK” or “Apply” to confirm the speed change and preview the effect in the timeline.
Slowing Down a Video Clip
- Decrease Speed: Enter a lower percentage value (e.g., 50%) to slow down the playback rate of the video clip.
- Time Stretching: Check “Maintain Audio Pitch” to preserve the original audio pitch while adjusting video speed.
Previewing Adjustments
- Playback: Playback your video clip to review speed adjustments and ensure smooth motion and desired pacing.
- Fine-Tuning: Make adjustments to speed settings as needed to achieve desired visual and narrative effects.
Advanced Speed Adjustment Techniques
Keyframing Speed Changes
- Keyframe Animation: Use keyframes to create dynamic speed changes within a video clip over time.
- Add Keyframes: Right-click on the speed adjustment line in the timeline and select “Add Keyframe” to set speed variations.
Speed Ramp Effects
- Speed Transitions: Apply speed ramp effects to gradually increase or decrease playback speed within specific video segments.
- Smooth Transitions: Use transition effects to blend speed changes seamlessly and enhance visual storytelling.
Freeze Frames and Time Effects
- Freeze Frames: Create freeze frames by setting speed to 0% at specific points in the timeline.
- Time Effects: Apply time effects (e.g., slow motion, fast motion) to entire video clips or selected segments for dramatic impact.
Creative Applications of Speed Adjustment
Action Sequences
- Action Pacing: Speed up action sequences to intensify movement and create dynamic energy.
- Slow Motion: Slow down scenes to emphasize details, emotions, or dramatic moments.
Timelapse and Hyperlapse
- Timelapse: Increase speed to create timelapse videos that compress long events or processes into shorter sequences.
- Hyperlapse: Combine speed adjustments with camera movement for dynamic hyperlapse effects.
Syncing with Music
- Music Videos: Match video pacing with music beats by adjusting speed to synchronize visuals with audio rhythms.
- Audio Beats: Use beat detection tools to align speed changes with specific audio beats or tempo changes.
Tips for Effective Speed Adjustment
Smooth Playback
- Preview Settings: Adjust preview settings to ensure smooth playback of speed-adjusted clips in the timeline.
- Render Quality: Optimize render settings to maintain video quality and playback smoothness in final exports.
Consistent Motion
- Frame Rate: Maintain consistent frame rates to preserve smooth motion and visual clarity across speed-adjusted clips.
- Transitions: Use crossfades or transitions to minimize abrupt changes in speed and ensure seamless playback.
Test Playback
- Playback Testing: Export test clips to review speed adjustment effects on different playback devices and screens.
- Feedback: Gather feedback from viewers to assess the impact and effectiveness of speed adjustments in your videos.
Troubleshooting Speed Adjustment Issues
Audio Sync
- Audio Alignment: Adjust audio track position or use audio stretching tools to maintain synchronization with speed-adjusted video.
- Manual Adjustments: Make manual adjustments to audio timing for precise alignment with video speed changes.
Visual Artifacts
- Artifact Detection: Identify and address visual artifacts such as motion blur or frame skipping in speed-adjusted clips.
- Quality Control: Check export settings and adjust rendering options to minimize artifacts and ensure video quality.
Performance Optimization
- Processing Load: Manage processing load by adjusting playback resolution or using proxy files during speed adjustment editing.
- Render Settings: Optimize render settings to maintain video quality and playback performance in final video outputs.
Conclusion
Mastering speed adjustment in PowerDirector allows you to transform video clips with creative control over pacing, timing, and visual impact. By following the tools and techniques outlined in this guide, you can effectively speed up or slow down video footage to enhance storytelling, emphasize key moments, and create engaging visual compositions that captivate and inspire your audience. Whether for cinematic effects, educational content, or creative projects, PowerDirector’s versatile speed adjustment tools empower you to explore and experiment with time manipulation, refine your video editing skills, and produce polished videos with compelling narrative flow and dynamic visual appeal. Experiment with different speed settings, leverage advanced editing options, and unleash your creativity to craft impactful videos enriched with dynamic pacing and seamless visual storytelling.


