How to reverse a video clip in PowerDirector

Reversing a video clip in PowerDirector allows you to create unique visual effects, play scenes backwards, or add creative elements to your video projects. PowerDirector, developed by CyberLink, offers intuitive tools for video editing, including the ability to reverse video clips with ease. This comprehensive guide will walk you through everything you need to know about reversing a video clip in PowerDirector, covering basic techniques, customization options, creative applications, troubleshooting tips, and more.
Understanding Video Reversal in Video Editing
Reversing a video clip involves playing the sequence backwards, creating a mirrored effect where actions and movements appear in reverse chronological order. Key aspects of video reversal include:
- Visual Effects: Adding visual interest and creativity by reversing actions.
- Narrative Impact: Enhancing storytelling or creating humorous effects.
- Editing Precision: Fine-tuning speed and transitions for seamless playback.
Mastering video reversal in PowerDirector allows you to experiment with time manipulation, enhance storytelling dynamics, and engage viewers with innovative visual presentations.
Getting Started with Video Reversal in PowerDirector
Importing Media
- Open PowerDirector: Launch PowerDirector and create a new project or open an existing one.
- Import Media Files: Import your video clip into the Media Room by clicking on “Import Media Files” and selecting your video file.
Adding Footage to Timeline
- Drag Video Clip: Drag your video clip from the Media Room to the timeline.
Reversing Video Clip
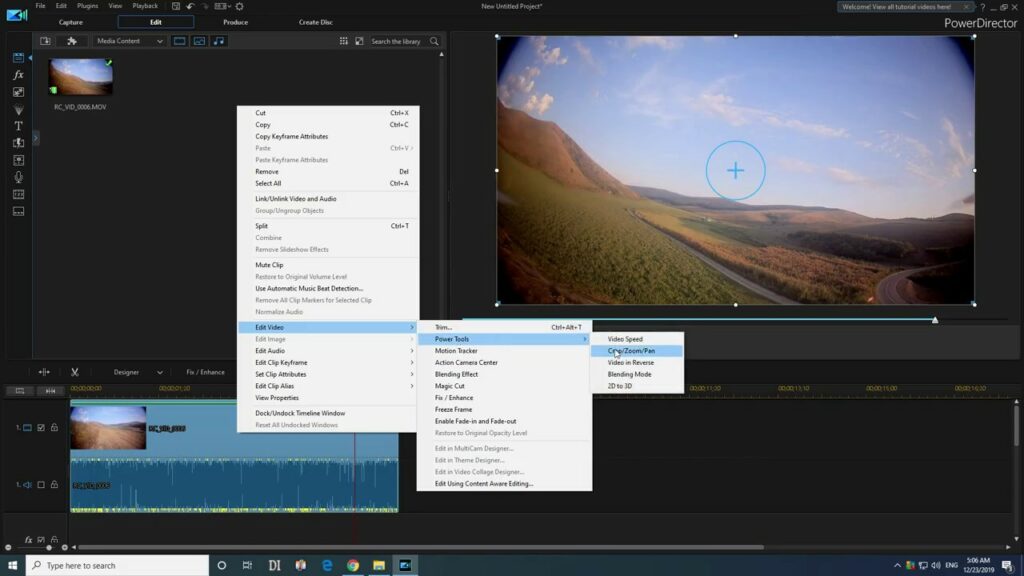
- Select Video Clip: Click on the video clip in the timeline to select it.
- Reversing Option: Right-click on the video clip and select “Reverse” from the context menu.
- Confirmation: Click “OK” or “Apply” to confirm the reversal and apply the effect to the video clip.
Previewing Reversed Clip
- Playback: Playback your video clip to review the reversed effect and ensure smooth playback and desired visual impact.
Advanced Reversal Techniques
Adjusting Speed and Transitions
- Speed Adjustment: Fine-tune playback speed for reversed clips to control pacing and visual impact.
- Transition Effects: Apply transition effects to smoothly blend reversed clips with other footage or segments in your project.
Keyframing and Animation
- Keyframe Control: Use keyframes to animate speed changes or apply effects within the reversed video clip.
- Custom Effects: Experiment with custom effects and adjustments to enhance creativity and storytelling in reversed sequences.
Layering and Compositing
- Overlay Effects: Combine reversed clips with other video layers or effects to create layered compositions.
- Blend Modes: Use blend modes to integrate reversed clips seamlessly with background elements or visual effects.
Creative Applications of Video Reversal
Dramatic Effects
- Action Sequences: Reverse action scenes to create suspenseful or dramatic effects.
- Visual Storytelling: Enhance narrative dynamics by revealing events in reverse order.
Humorous or Creative Effects
- Comedic Timing: Use video reversal for comedic timing or unexpected visual gags.
- Creative Projects: Experiment with artistic or experimental videos using reversed footage.
Visual Transitions and Loops
- Transition Effects: Create unique transitions by reversing segments between scenes or sequences.
- Loop Effects: Loop reversed clips for continuous playback or seamless visual loops in video projects.
Tips for Effective Video Reversal
Smooth Playback
- Preview Settings: Adjust preview settings to ensure smooth playback and real-time editing of reversed clips.
- Render Quality: Optimize render settings to maintain video quality and playback performance in final exports.
Consistency and Timing
- Frame Rates: Maintain consistent frame rates to preserve smooth motion and visual clarity in reversed footage.
- Audio Alignment: Adjust audio timing or use audio stretching tools to synchronize reversed video clips with original soundtracks.
Experimentation and Feedback
- Creative Exploration: Experiment with different reversal effects, speeds, and transitions to explore creative possibilities.
- Feedback: Gather feedback from viewers or peers to assess the impact and effectiveness of reversed sequences in your videos.
Troubleshooting Video Reversal Issues
Artifacts and Playback
- Artifact Detection: Identify and address visual artifacts such as motion blur or frame skipping in reversed clips.
- Quality Control: Check export settings and adjust rendering options to minimize artifacts and ensure video quality.
Audio Sync
- Audio Alignment: Fine-tune audio synchronization with reversed video clips to maintain consistency and clarity.
- Manual Adjustments: Make manual adjustments to audio timing or use editing tools for precise audio alignment.
Performance Optimization
- Processing Load: Manage processing load by adjusting playback resolution or using proxy files during video reversal editing.
- Render Settings: Optimize render settings to maintain video quality and playback performance in final video outputs.
Conclusion
Mastering video reversal in PowerDirector allows you to explore creative storytelling, enhance visual dynamics, and engage viewers with innovative video effects. By following the tools and techniques outlined in this guide, you can effectively reverse video clips, manipulate time sequences, and experiment with creative applications to elevate your video projects. Whether for cinematic storytelling, comedic effects, or artistic experimentation, PowerDirector’s intuitive tools empower you to unleash your creativity, refine your video editing skills, and produce compelling videos enriched with dynamic visual storytelling and unique temporal effects. Experiment with different reversal techniques, explore advanced editing options, and embrace the versatility of video reversal to create impactful videos that captivate and inspire your audience.


