How to install a PCIe SSD
Installing a PCIe SSD (Solid State Drive) is an effective way to significantly boost your computer’s storage performance, offering faster data transfer speeds and quicker system responsiveness compared to traditional hard disk drives (HDDs) or even SATA SSDs. This comprehensive guide will walk you through the process of selecting a PCIe SSD, preparing your system for installation, physically installing the SSD, and configuring it for optimal performance.
Table of Contents
- Introduction to PCIe SSDs
- Benefits of PCIe SSDs
- Types of PCIe SSD Form Factors
- Pre-Installation Preparation
- Choosing the Right PCIe SSD
- System Compatibility Check
- Installing the PCIe SSD
- Tools and Materials Needed
- Opening the Computer Case
- Mounting the PCIe SSD
- Inserting the PCIe SSD into the Slot
- Securing the PCIe SSD
- Connecting Power and Data Cables
- Power Connection
- Data Cable Connection
- Configuring BIOS/UEFI Settings
- BIOS/UEFI Access
- Setting PCIe SSD as Boot Drive (if necessary)
- Operating System Installation
- Fresh Installation vs. Cloning
- Installing Operating System on PCIe SSD
- Testing and Verifying Installation
- Verifying Drive Detection
- Benchmarking and Performance Testing
- Conclusion
1. Introduction to PCIe SSDs
Benefits of PCIe SSDs
PCIe SSDs offer several advantages over traditional storage solutions:
- Speed: PCIe SSDs provide significantly faster data transfer speeds compared to SATA SSDs, enhancing system responsiveness and reducing load times.
- Bandwidth: Utilizing the PCIe interface, these SSDs can achieve higher bandwidths, making them ideal for tasks that require rapid data access, such as gaming, video editing, and data-intensive applications.
- Form Factor Options: PCIe SSDs come in various form factors, including add-in cards (AICs) and M.2 modules, offering flexibility in installation and compatibility with different systems.
Types of PCIe SSD Form Factors
- Add-In Cards (AICs): These PCIe SSDs resemble graphics cards and are installed into PCIe slots on the motherboard.
- M.2 Modules: M.2 PCIe SSDs are small, slim modules that directly attach to the motherboard via an M.2 slot, offering a compact and space-efficient solution.
2. Pre-Installation Preparation
Choosing the Right PCIe SSD
- Performance Needs: Determine the storage capacity and performance requirements (read/write speeds, IOPS) based on your usage (e.g., gaming, professional applications).
- Form Factor: Select an appropriate form factor (AIC or M.2) that is compatible with your motherboard and provides the desired installation flexibility.
System Compatibility Check
- Motherboard Compatibility: Verify that your motherboard has an available PCIe slot (for AICs) or an M.2 slot (for M.2 modules) that supports PCIe SSDs.
- Operating System Support: Ensure your operating system (OS) supports PCIe SSDs and can take advantage of their performance benefits.
3. Installing the PCIe SSD
Tools and Materials Needed
- Phillips Screwdriver: To open the computer case and secure the PCIe SSD.
- Antistatic Wrist Strap (Recommended): Prevents electrostatic discharge (ESD) that can damage sensitive electronic components.
Opening the Computer Case
- Power Off and Disconnect: Shut down your computer and disconnect all power cables from the power supply unit (PSU).
- Open Computer Case: Remove the side panel of your computer case to gain access to the internal components.
4. Mounting the PCIe SSD
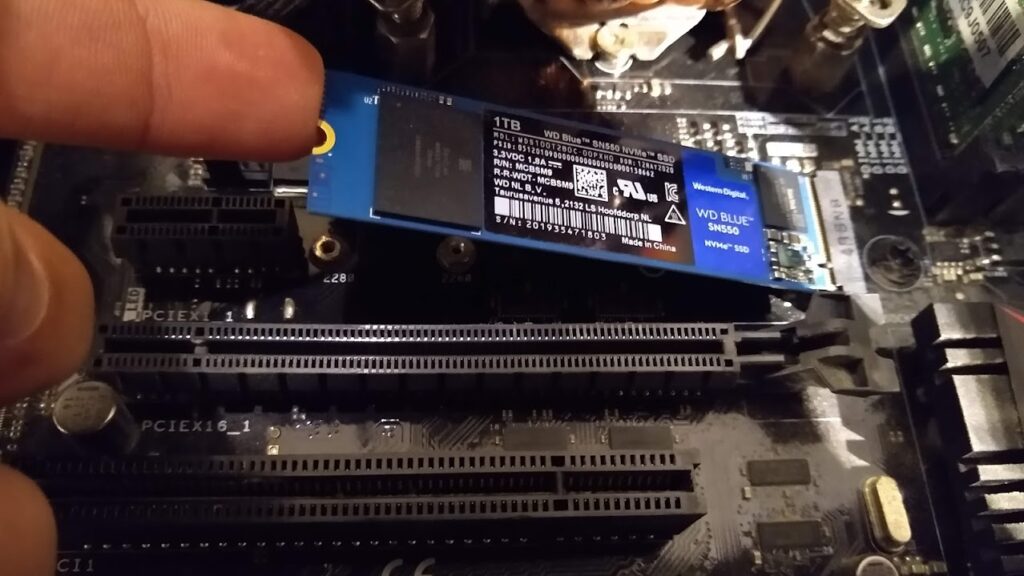
Inserting the PCIe SSD into the Slot
- Locate PCIe Slot: Identify an available PCIe slot on your motherboard that matches the PCIe SSD form factor (AIC or M.2).
- Align and Insert: For AICs, align the PCIe SSD with the PCIe slot and gently insert it until it is fully seated. For M.2 modules, insert the module into the M.2 slot at a 30-45 degree angle, then secure it into place by pressing down and fastening the screw.
Securing the PCIe SSD
- Secure with Screw: Use the screw provided with the motherboard or PCIe SSD to secure the AIC in place. For M.2 modules, tighten the screw to secure the module firmly into the M.2 slot.
5. Connecting Power and Data Cables
Power Connection
- For AICs: Some AICs require additional power connections from the PSU using PCIe power cables.
- For M.2 Modules: M.2 modules typically do not require separate power connections, as they draw power directly from the motherboard.
Data Cable Connection
- For AICs: No additional data cables are typically required, as data is transferred through the PCIe slot.
- For M.2 Modules: Some M.2 slots may require a screw to secure the module and ensure stable data connectivity.
6. Configuring BIOS/UEFI Settings
BIOS/UEFI Access
- Restart Computer: Power on your computer and access the BIOS/UEFI settings by pressing the designated key during the boot process (e.g., Del, F2, F10).
- Navigate to Storage Settings: Locate the storage or boot settings menu within the BIOS/UEFI interface.
Setting PCIe SSD as Boot Drive (if necessary)
- Boot Priority: Set the PCIe SSD as the primary boot device if you intend to install the operating system on it. Navigate to the boot order settings and prioritize the PCIe SSD.
7. Operating System Installation
Fresh Installation vs. Cloning
- Fresh Installation: Install the operating system directly onto the PCIe SSD from an installation media (USB drive or DVD), ensuring it is selected as the installation destination.
- Cloning (Optional): Use disk cloning software to migrate existing OS and data from your current drive to the new PCIe SSD, preserving settings and files.
Installing Operating System on PCIe SSD
- Follow OS Installation Prompts: Follow on-screen instructions to complete the OS installation process, formatting the PCIe SSD if prompted.
8. Testing and Verifying Installation
Verifying Drive Detection
- Check BIOS/UEFI: Verify that the PCIe SSD is detected in the BIOS/UEFI storage settings and correctly identified by the system.
Benchmarking and Performance Testing
- Performance Benchmarks: Use benchmarking software (e.g., CrystalDiskMark, AS SSD) to measure read/write speeds and overall performance gains compared to previous storage solutions.
- Real-World Testing: Test system responsiveness and application load times to assess the practical benefits of the PCIe SSD upgrade.
9. Conclusion
Installing a PCIe SSD is a rewarding upgrade that can significantly enhance your computer’s storage performance, providing faster data access and improved system responsiveness for a variety of applications. By following this detailed guide, you can confidently select, install, and configure a PCIe SSD, ensuring compatibility with your system and maximizing the performance benefits offered by modern storage technology. Whether for gaming, professional work, or everyday computing tasks, a PCIe SSD upgrade represents a substantial improvement in overall system performance and user experience.


