How to configure RAID in BIOS
Configuring RAID (Redundant Array of Independent Disks) in BIOS is a fundamental process for improving data redundancy, performance, or both, depending on the RAID level chosen. This comprehensive guide will walk you through the steps of configuring RAID in BIOS, covering the basics of RAID, different RAID levels, prerequisites, BIOS setup procedures, and common troubleshooting tips.
Table of Contents
- Introduction to RAID
- What is RAID?
- Benefits of RAID Configurations
- Understanding RAID Levels
- RAID 0 (Striping)
- RAID 1 (Mirroring)
- RAID 5 (Striping with Parity)
- RAID 10 (Combination of RAID 1 and RAID 0)
- RAID 6 and Others
- Prerequisites for Configuring RAID in BIOS
- Compatible Motherboard and Chipset
- Supported Storage Devices
- Data Backup
- Steps to Configure RAID in BIOS
- Accessing BIOS Setup
- Enabling RAID Mode
- Creating RAID Arrays
- Configuring RAID Levels
- Testing RAID Configuration
- Verifying RAID Status
- Benchmarking Performance
- Troubleshooting RAID Configuration
- Common Issues
- Tips for Resolving Issues
- Conclusion
1. Introduction to RAID
What is RAID?
RAID is a storage technology that combines multiple disks into a single logical unit to enhance performance, redundancy, or both. By distributing or replicating data across disks, RAID configurations provide improved reliability, faster data access speeds, or a combination of both benefits.
Benefits of RAID Configurations
- Data Redundancy: RAID configurations such as RAID 1, RAID 5, and RAID 10 offer data redundancy through mirroring or parity, protecting against data loss in case of disk failure.
- Performance Improvement: RAID 0 and RAID 10 configurations enhance read and write speeds by striping data across multiple disks.
- Scalability: RAID configurations support scalability by adding additional disks to existing arrays, accommodating growing storage needs.
2. Understanding RAID Levels
RAID 0 (Striping)
- Description: Data is divided (striped) across multiple disks without redundancy.
- Advantages: Enhanced read/write performance due to parallel data access across disks.
- Disadvantages: No data redundancy; failure of one disk results in data loss across the entire array.
RAID 1 (Mirroring)
- Description: Data is duplicated (mirrored) on two or more disks.
- Advantages: Redundancy; data remains accessible if one disk fails.
- Disadvantages: Storage capacity is limited to the size of one disk; costlier in terms of disk usage.
RAID 5 (Striping with Parity)
- Description: Data is striped across three or more disks with parity distributed among them.
- Advantages: Provides a balance of performance and redundancy; allows for data recovery if one disk fails.
- Disadvantages: Slower write performance due to parity calculation overhead.
RAID 10 (Combination of RAID 1 and RAID 0)
- Description: Data is mirrored and striped across multiple disks.
- Advantages: Offers both redundancy (through mirroring) and performance improvement (through striping).
- Disadvantages: Requires a minimum of four disks; effective storage capacity is half of the total disk space.
RAID 6 and Others
- RAID 6: Similar to RAID 5 but with dual parity, providing higher fault tolerance against simultaneous failure of two disks.
- Other RAID Levels: Various RAID levels exist, each catering to specific needs such as performance, redundancy, or a balance of both, using different combinations of striping, mirroring, and parity.
3. Prerequisites for Configuring RAID in BIOS
Compatible Motherboard and Chipset
- RAID Support: Ensure your motherboard supports RAID configurations and has a compatible RAID controller (typically integrated into the chipset or as a separate RAID card).
- BIOS/UEFI Support: Access to RAID configuration settings within the BIOS/UEFI setup utility.
Supported Storage Devices
- Compatible Disks: RAID configurations require identical or similar disks (in terms of capacity and speed) to maintain optimal performance and reliability.
- SATA or NVMe: Support for SATA or NVMe SSDs and HDDs, depending on the RAID controller and motherboard specifications.
Data Backup
- Backup Considerations: Before configuring RAID, ensure all critical data is backed up to an external storage device or cloud service to prevent data loss during configuration or in case of unforeseen issues.
4. Steps to Configure RAID in BIOS
Accessing BIOS Setup
- Restart Computer: Save any ongoing work and restart your computer.
- Access BIOS/UEFI: During the boot process, press the designated key (e.g., Del, F2, F10) to enter the BIOS/UEFI setup utility.
Enabling RAID Mode
- Navigate to Integrated Peripherals: Locate the section within BIOS/UEFI setup related to integrated peripherals or storage settings.
- RAID Mode Option: Enable RAID mode or change the SATA operation mode to RAID (specific wording may vary depending on BIOS manufacturer).
Creating RAID Arrays
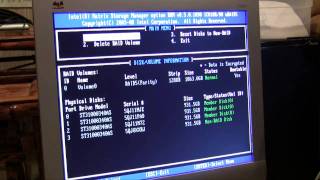
- Enter RAID Configuration Utility: Access the RAID configuration utility typically found within the BIOS/UEFI setup under storage or RAID settings.
- Initialize Disks: Initialize and format disks if required by the RAID configuration utility.
- Create RAID Array: Follow on-screen prompts to create a RAID array, selecting RAID level (e.g., RAID 0, RAID 1, RAID 5) and disks to include in the array.
Configuring RAID Levels
- RAID Configuration Options: Customize RAID settings such as stripe size (for RAID 0 and RAID 5), disk caching, and other advanced settings available in the RAID configuration utility.
- Save Configuration: Save the RAID configuration settings and exit the BIOS/UEFI setup utility.
5. Testing RAID Configuration
Verifying RAID Status
- Boot Verification: Reboot the computer and access the RAID configuration utility or BIOS/UEFI setup to verify the status of the configured RAID array.
- Drive Detection: Ensure all disks are detected and functioning within the configured RAID array without errors.
Benchmarking and Performance Testing
- Benchmark Tools: Use benchmarking software (e.g., CrystalDiskMark, ATTO Disk Benchmark) to measure read/write speeds and overall performance of the RAID array.
- Performance Evaluation: Compare benchmark results with expected performance gains based on the chosen RAID level to validate configuration effectiveness.
6. Troubleshooting RAID Configuration
Common Issues
- RAID Not Detected: Verify all cables are securely connected and RAID mode is properly enabled in BIOS/UEFI settings.
- Data Loss or Corruption: Ensure data backups are current and verify disk initialization and RAID array creation steps.
- Performance Degradation: Check for firmware updates for RAID controller and motherboard BIOS/UEFI to improve compatibility and performance.
Tips for Resolving Issues
- Update Drivers and Firmware: Install latest drivers and firmware updates for RAID controller, motherboard chipset, and storage devices.
- Consult Manufacturer Documentation: Refer to motherboard and RAID controller manuals for specific troubleshooting steps and configuration guidelines.
- Seek Technical Support: Contact manufacturer support or consult online forums for assistance from experienced users or technical experts.
7. Conclusion
Configuring RAID in BIOS offers various benefits depending on your storage needs, from enhanced performance to increased data redundancy and fault tolerance. By following this comprehensive guide, you can confidently navigate the process of selecting RAID levels, preparing your system, and configuring RAID arrays within the BIOS/UEFI setup utility. Remember to consider compatibility, backup critical data, and perform thorough testing to ensure a successful RAID configuration that meets your performance and reliability requirements. With proper configuration and maintenance, RAID arrays provide a robust storage solution for both personal and professional computing environments, optimizing data management and enhancing system efficiency.


