How to Configure Email on a Smartphone: A Comprehensive Guide
Configuring email on your smartphone is a fundamental task that enables you to manage your communications efficiently while on the go. Whether you are using an iPhone or an Android device, setting up email can be straightforward if you follow the proper steps. This guide will walk you through configuring various types of email accounts, such as Gmail, Outlook, Yahoo, and other IMAP/POP3 accounts, on your smartphone. It will also cover troubleshooting tips and best practices to ensure a seamless email experience.
Understanding Email Configuration
Types of Email Accounts
- IMAP (Internet Message Access Protocol):
- Allows access to emails on multiple devices.
- Synchronizes emails and folders across devices.
- Keeps emails on the server until you delete them.
- POP3 (Post Office Protocol 3):
- Downloads emails from the server to a single device.
- Emails are typically removed from the server after download.
- Suitable for accessing emails on one device only.
- Exchange (Microsoft Exchange):
- Used primarily for business accounts.
- Synchronizes emails, contacts, calendars, and tasks.
- Provides advanced features like push email and remote wipe.
Required Information
Before setting up your email account, gather the following information:
- Email Address: Your full email address (e.g., [email protected]).
- Password: Your email account password.
- Incoming Mail Server: IMAP or POP3 server address (e.g., imap.example.com or pop.example.com).
- Outgoing Mail Server: SMTP server address (e.g., smtp.example.com).
- Port Numbers: Port numbers for incoming (IMAP/POP3) and outgoing (SMTP) servers.
- Security Settings: SSL/TLS requirements for incoming and outgoing servers.
Setting Up Email on an iPhone
Using the Built-in Mail App
Step 1: Open Settings
- Open Settings: Tap the “Settings” app on your iPhone.
- Navigate to Mail: Scroll down and tap “Mail.”
Step 2: Add Account
- Tap Accounts: Under the “Mail” section, tap “Accounts.”
- Add Account: Tap “Add Account.”
Step 3: Select Email Provider
- Choose Provider: Select your email provider (e.g., Google, Yahoo, Outlook.com) or tap “Other” for IMAP/POP3 accounts.
Step 4: Enter Account Information
- Email and Password: Enter your email address and password.
- IMAP/POP3 Settings: If you selected “Other,” enter the incoming and outgoing mail server details.
- Save Settings: Tap “Next” and then “Save.”
Step 5: Configure Additional Settings
- Mail, Contacts, Calendars: Choose which items you want to sync (e.g., Mail, Contacts, Calendars).
- Customize Settings: Adjust additional settings such as notification preferences.
Using the Gmail App (for Gmail Accounts)
Step 1: Download and Open Gmail App
- Download Gmail: If not already installed, download the Gmail app from the App Store.
- Open Gmail: Open the Gmail app.
Step 2: Add Account
- Tap Profile Icon: Tap the profile icon in the top right corner.
- Add Another Account: Tap “Add another account.”
Step 3: Select Google
- Select Google: Choose “Google” from the list of email providers.
- Sign In: Follow the prompts to sign in with your Google account.
Step 4: Sync Preferences
- Choose Sync Options: Select what you want to sync (e.g., Mail, Contacts, Calendars).
- Finish Setup: Complete the setup process by following the on-screen instructions.
Setting Up Email on an Android Device
Using the Built-in Email App
Step 1: Open Email App
- Open Email: Tap the “Email” app on your Android device.
- Add Account: If you haven’t set up an email account yet, you will be prompted to add one.
Step 2: Enter Account Information
- Email Address and Password: Enter your email address and password.
- Manual Setup: For custom IMAP/POP3 settings, tap “Manual Setup.”
Step 3: Configure Incoming Server
- IMAP/POP3 Settings: Enter the incoming server settings (server address, port number, security type).
- Authenticate: Enter your email account password if prompted.
Step 4: Configure Outgoing Server
- SMTP Settings: Enter the outgoing server settings (server address, port number, security type).
- Authenticate: Enter your email account password if prompted.
Step 5: Complete Setup
- Sync Preferences: Choose what you want to sync (e.g., Mail, Contacts, Calendars).
- Notification Settings: Customize your email notifications.
Using the Gmail App (for Gmail Accounts)
Step 1: Download and Open Gmail App
- Download Gmail: If not already installed, download the Gmail app from the Google Play Store.
- Open Gmail: Open the Gmail app.
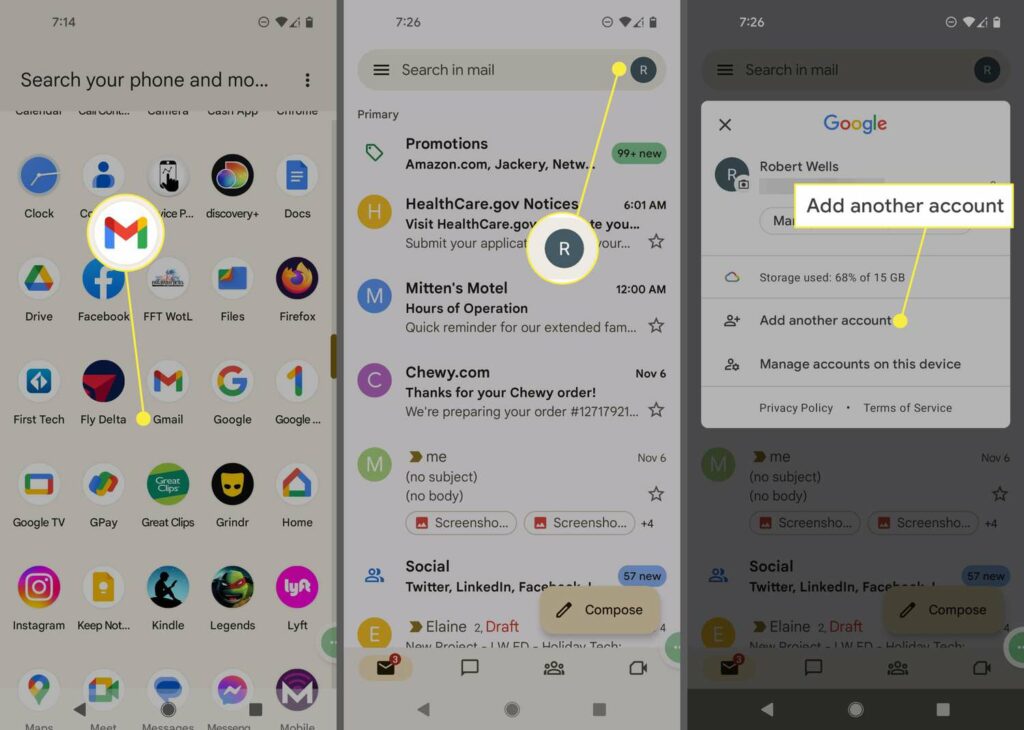
Step 2: Add Account
- Tap Profile Icon: Tap the profile icon in the top right corner.
- Add Another Account: Tap “Add another account.”
Step 3: Select Google
- Select Google: Choose “Google” from the list of email providers.
- Sign In: Follow the prompts to sign in with your Google account.
Step 4: Sync Preferences
- Choose Sync Options: Select what you want to sync (e.g., Mail, Contacts, Calendars).
- Finish Setup: Complete the setup process by following the on-screen instructions.
Setting Up Popular Email Accounts
Gmail
iPhone Mail App
- Open Settings: Tap “Settings” > “Mail” > “Accounts” > “Add Account.”
- Select Google: Tap “Google” and sign in with your Gmail credentials.
- Sync Preferences: Choose what to sync and tap “Save.”
Android Email App
- Open Email: Open the Email app and enter your Gmail address.
- Manual Setup: If prompted, select “IMAP” and enter the server details:
- Incoming Server: imap.gmail.com
- Outgoing Server: smtp.gmail.com
- Sync Preferences: Choose what to sync and complete the setup.
Outlook
iPhone Mail App
- Open Settings: Tap “Settings” > “Mail” > “Accounts” > “Add Account.”
- Select Outlook.com: Tap “Outlook.com” and sign in with your Outlook credentials.
- Sync Preferences: Choose what to sync and tap “Save.”
Android Email App
- Open Email: Open the Email app and enter your Outlook address.
- Manual Setup: If prompted, select “IMAP” and enter the server details:
- Incoming Server: outlook.office365.com
- Outgoing Server: smtp.office365.com
- Sync Preferences: Choose what to sync and complete the setup.
Yahoo Mail
iPhone Mail App
- Open Settings: Tap “Settings” > “Mail” > “Accounts” > “Add Account.”
- Select Yahoo: Tap “Yahoo” and sign in with your Yahoo credentials.
- Sync Preferences: Choose what to sync and tap “Save.”
Android Email App
- Open Email: Open the Email app and enter your Yahoo address.
- Manual Setup: If prompted, select “IMAP” and enter the server details:
- Incoming Server: imap.mail.yahoo.com
- Outgoing Server: smtp.mail.yahoo.com
- Sync Preferences: Choose what to sync and complete the setup.
iCloud Mail
iPhone Mail App
- Open Settings: Tap “Settings” > “Mail” > “Accounts” > “Add Account.”
- Select iCloud: Tap “iCloud” and sign in with your Apple ID.
- Sync Preferences: Choose what to sync and tap “Save.”
Android Email App
- Open Email: Open the Email app and enter your iCloud address.
- Manual Setup: If prompted, select “IMAP” and enter the server details:
- Incoming Server: imap.mail.me.com
- Outgoing Server: smtp.mail.me.com
- Sync Preferences: Choose what to sync and complete the setup.
Troubleshooting Email Configuration Issues
Common Issues and Solutions
- Incorrect Password or Username:
- Double-check your email address and password.
- Ensure Caps Lock is off when entering your credentials.
- Server Settings Errors:
- Verify incoming and outgoing server addresses and port numbers.
- Ensure you are using the correct security type (SSL/TLS).
- Unable to Connect to Server:
- Check your internet connection.
- Ensure your firewall or antivirus is not blocking the connection.
- Emails Not Syncing:
- Ensure sync is enabled in your email app settings.
- Check for software updates for your email app or smartphone.


